Knowledge base
1000 FAQs, 500 tutorials and instructional videos. Here, there are only solutions!
This guide introduces Work Teams, a user management system for your Organization, available on the Infomaniak Manager.
Preamble
- To facilitate access and the addition of a collaborator within the Infomaniak ecosystem, the Work Teams feature allows you to create user groups and grant them access to the services they need with just a few clicks.
- A few examples:
- You create a team for a new department: immediately associate its mailboxes, its kDrive organization folders, and its dedicated kChat discussion channels; each new collaborator added to the team will automatically receive all these accesses.
- You are a web agency and you want to give your webmaster teams access to all of your web hostings: simply create a new group, choose all the hostings they will need access to, and invite them to the work team.
- You own a kDrive: authorize access to a folder for a Team and adjust access based on users added to or removed from the team over time.
- You use Streaming or Ticketing services and want to give your teams access: create a new team that will have access to these two products or two separate teams that will have access to the two products completely independently.
- It is entirely possible:
- to associate resources (Mail, kDrive, kChat) upon creation of the team to automate onboarding,
- to adjust individual access levels: for kDrive, individual access takes precedence over team access, while for Mail, access levels are cumulative.
- to add the same user to multiple teams,
- to invite external users to your Organization to one of your teams,
- to add one or more users to a team at once,
- to designate a team leader to easily identify a project manager or the point of contact.
Manage your teams
Managing teams now allows for complete centralization. No need to intervene in each tool separately: everything is controlled from the Infomaniak Manager for a smooth reorganization of your collaborators. Learn about the guides on this topic:
Link to this FAQ:
Has this FAQ been helpful?
This guide is intended for Infomaniak customers with a business registered in a European Union (EU) country and details how to enter or modify your European VAT number to allow the application of the appropriate billing rules.
Preamble
- EU businesses can benefit from the VAT self-billing mechanism by providing a valid intra-community VAT number. In this case, Infomaniak does not collect the tax, and it is up to the business to declare and pay the VAT in its country of residence.
- For a Swiss company, this number is not applicable:
- The Switzerland has its own tax system separate from that of the EU.
- Swiss companies are subject to Swiss VAT and are not concerned by the self-billing mechanisms specific to intra-community transactions of the EU.
Add your VAT number
You will be able to enter your VAT number when ordering your first Infomaniak product, when your company details (corresponding to your Organization) are requested.
To add or modify the VAT number at any time:
- Click here to access the management of your Organization's details on the Infomaniak Manager.
- Fill in the VAT number field:
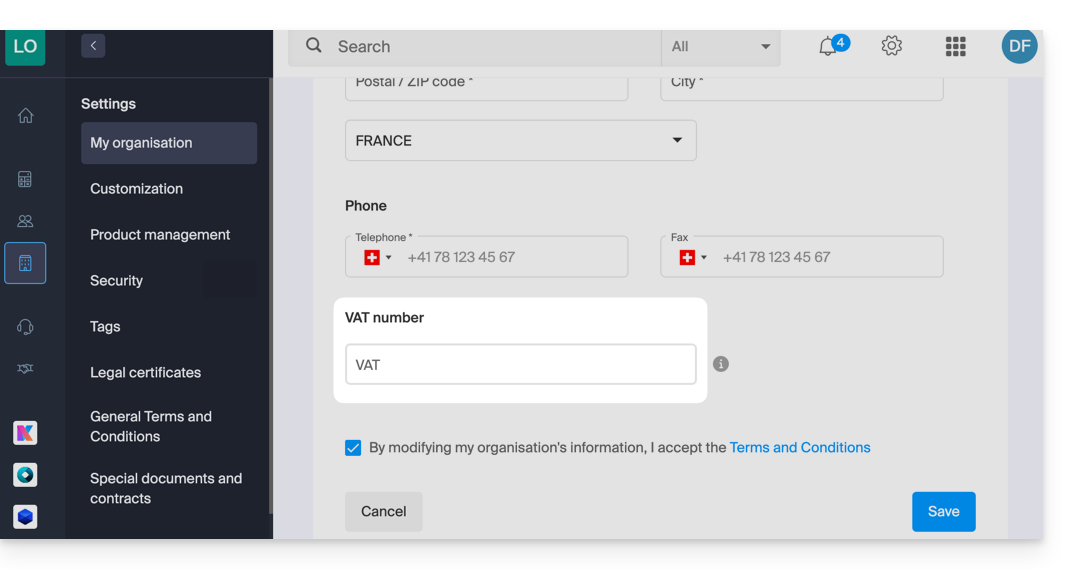
- Read and check the general terms and conditions box, then click on Save.
If necessary, refer to this other guide regarding other modifiable parameters.
Link to this FAQ:
Has this FAQ been helpful?
This guide explains how to enable or disable the Renewal Warranty option for Infomaniak products.
Preamble
- Renewal Warranty is an additional security measure to ensure the continuity of your products in case you were unable to renew the products on time or if an automatic renewal did not work; it allows you to avoid any service interruption.
- Infomaniak will renew the products for you and issue an invoice that you will find in your account.
- This option is available at the time of purchase (except for the NAS Synology product) or after purchase.
Enable the Renewal Warranty option
One product at a time
To enable Renewal Warranty on the product of your choice:
- Click here to access the management of payments on the Infomaniak Manager (need help?).
- Click on the action menu ⋮ located to the right of the item concerned.
- Choose to enable the option:
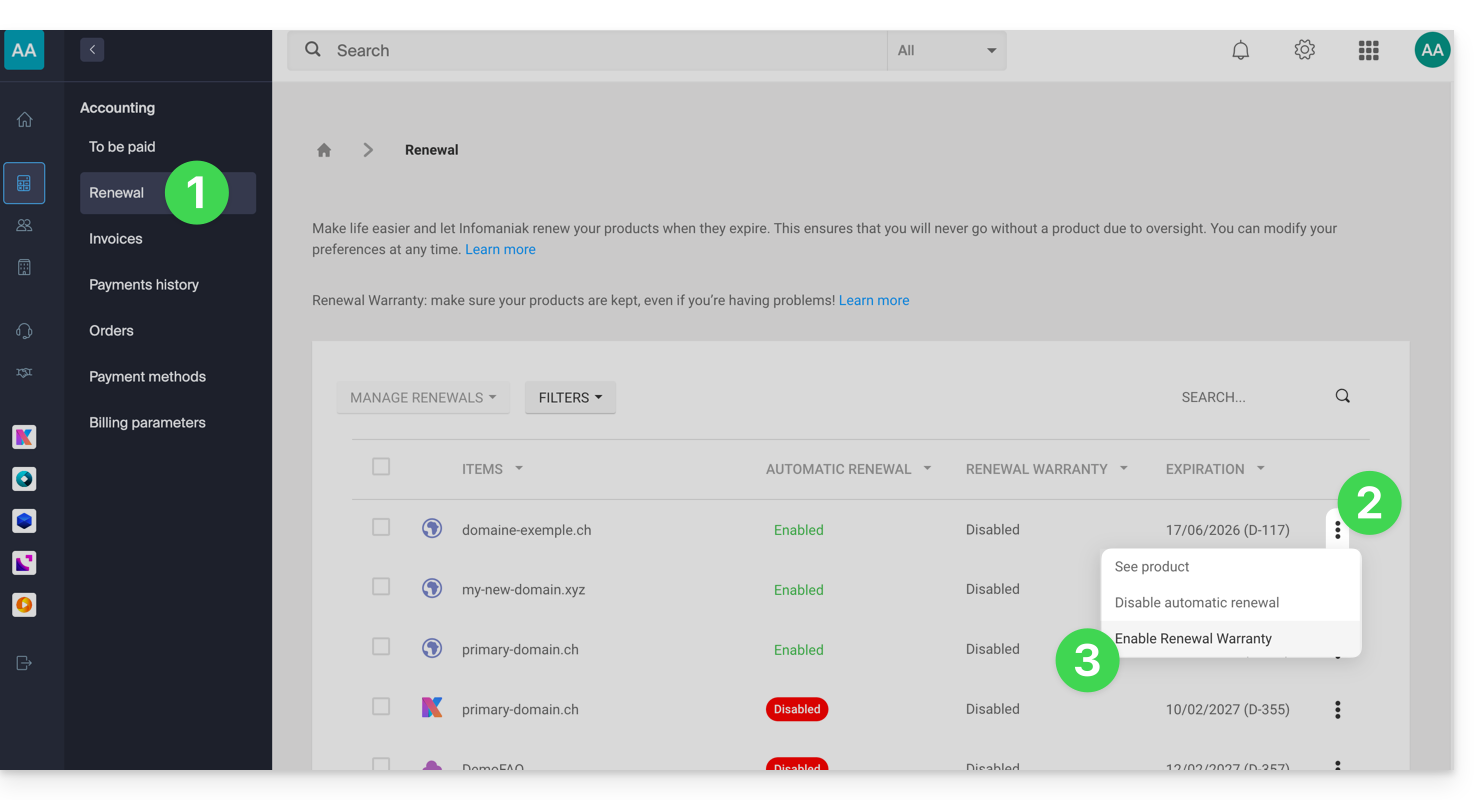
- Follow the instructions of the modal that has opened.
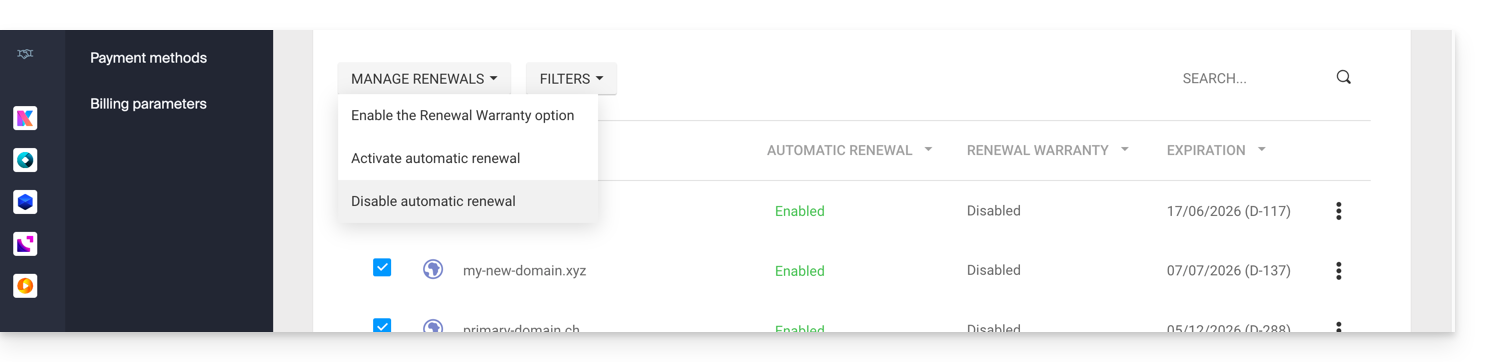
All products at once
To enable Renewal Warranty on several of your products:
- Click here to access the management of renewals on the Infomaniak Manager (need help?).
- Click on the checkbox at the top of the column to select all your products in 1 click.
- Click on the Manage renewals button.
- Choose to enable the option:
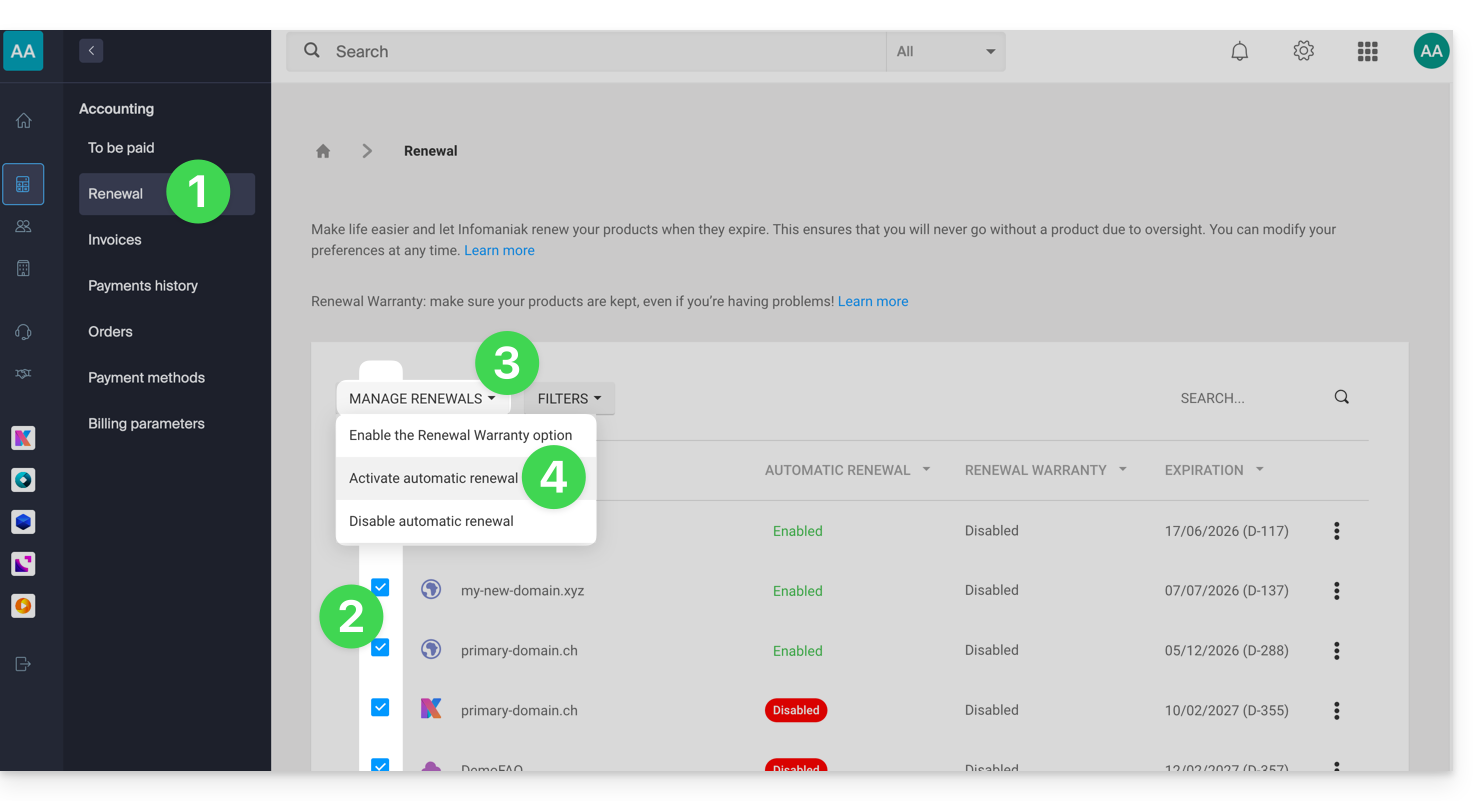
- Follow the instructions of the modal that has opened.
Disable the Renewal Warranty option
One product at a time
To disable Renewal Warranty on the product of your choice:
- Click here to access the management of payments on the Infomaniak Manager (need help?).
- Click on the action menu ⋮ located to the right of the item concerned.
- Choose to deactivate the option:
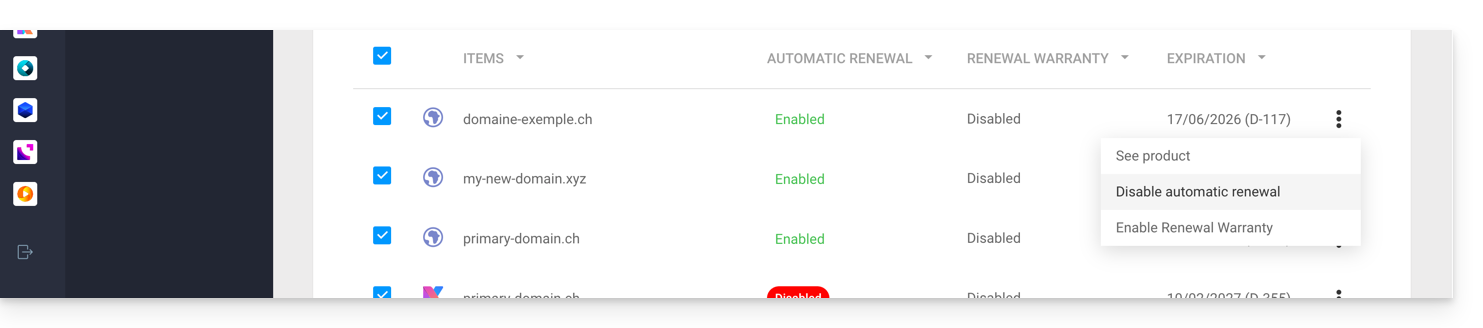
- Follow the instructions of the modal that has opened.
All products at once
To deactivate Renewal Warranty on multiple of your products:
- Click here to access the management of renewals on the Infomaniak Manager (need help?).
- Click on the checkbox at the top of the column to select all your products in 1 click.
- Click on the Manage renewals button.
- Choose to deactivate the option:
- Follow the instructions of the modal that has opened.
Link to this FAQ:
Has this FAQ been helpful?
Infomaniak takes pride in securing data through an integral and diversified approach to security. For whistleblowers, the company has implemented an internal system for reporting irregularities securely and anonymously, without fear of reprisals. This protection mechanism is known and accessible to all employees, thus reinforcing transparency and accountability within the organization.
Processing times
Infomaniak demonstrates its commitment with concrete and effective measures to protect those who report anomalies. The company commits to processing each report submitted via its abuse form within defined deadlines to ensure optimal reactivity and maintain user trust.
To ensure effective and transparent processing, Infomaniak has established a structured process with precise deadlines:
- It commits to acknowledging receipt of all reports within 24 hours of their submission, thus allowing reporters to confirm that their request has been received by the competent technical teams.
- In a second step, the company conducts a preliminary assessment within 5 business days to determine the admissibility of the report and identify the resources necessary for its processing. This phase allows for the classification of the priority level and the referral of the file to the appropriate specialized teams.
- When an investigation is necessary, Infomaniak conducts an in-depth analysis within a maximum period of 30 business days, depending on the nature and complexity of the reported case. This period allows the security teams to carry out the required technical checks, collect the necessary evidence, and assess the potential impact of the reported situation.
- Finally, the company commits to completing the analysis and implementing the appropriate corrective actions within a period of 60 business days when technically possible.
This final step includes the implementation of preventive measures, communication of the results to the parties concerned, and follow-up on the recommendations issued to prevent the recurrence of identified problems.
Infomaniak also commits to keeping complainants informed of the follow-up given to a complaint, provided that the complainant has completed the form by indicating a contact email address.
Also refer to the blog article on this subject.
Link to this FAQ:
Has this FAQ been helpful?
This guide explains how to log out of an Infomaniak account (user account) from the Infomaniak Manager. Once logged out, it is easy to log back in to a different Infomaniak account, and thus access a different Organization or a user with a different role in the same Organization.
Log out and log back in with Infomaniak credentials
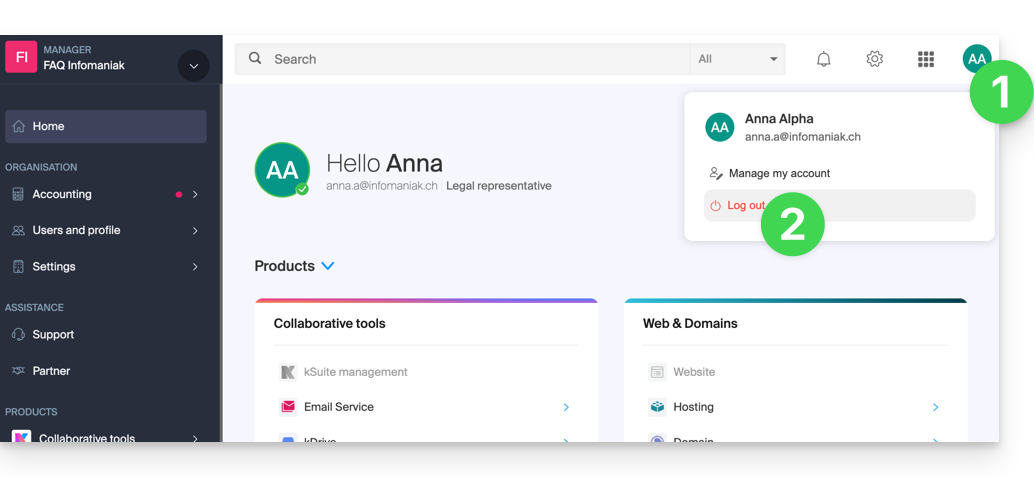
To log out of an Infomaniak account and log back in to another one:
- Click on the badge with your initials / avatar at the top right of the Infomaniak Manager.
- Click on Log out:
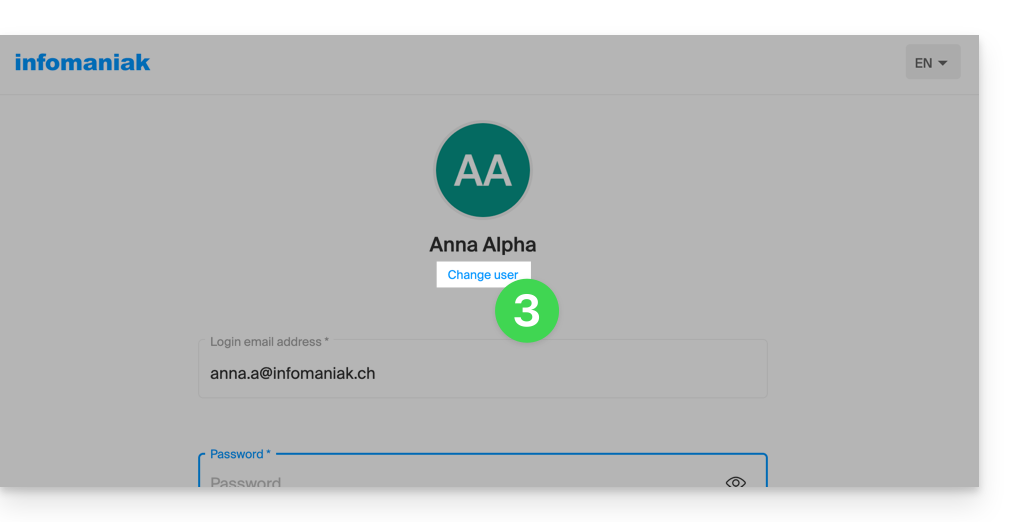
- Click on Switch user:
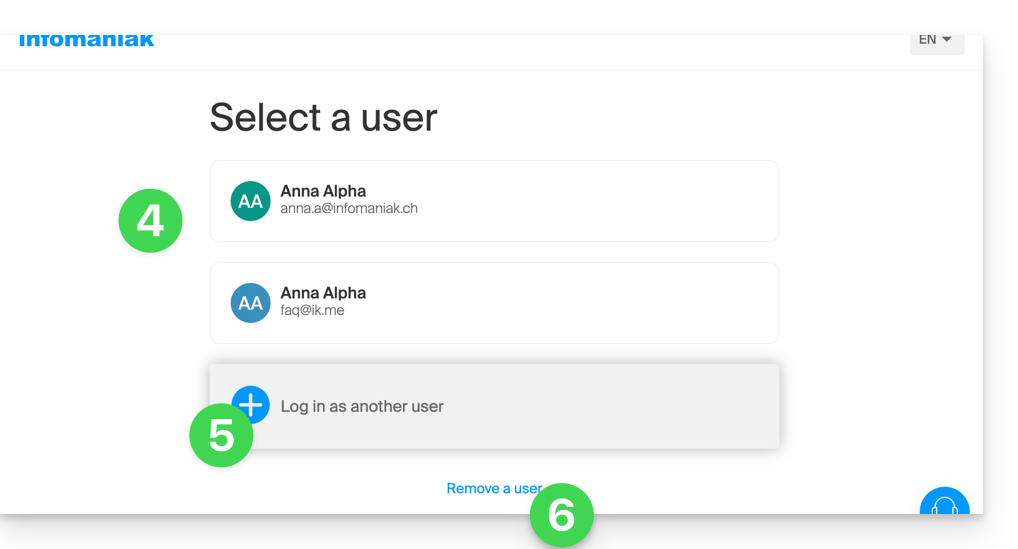
- Choose another pre-registered user…
- … or click on the button to log in with new credentials…
- … or, delete one of the already memorized users:
- Enter the login information and click on the Log in button.
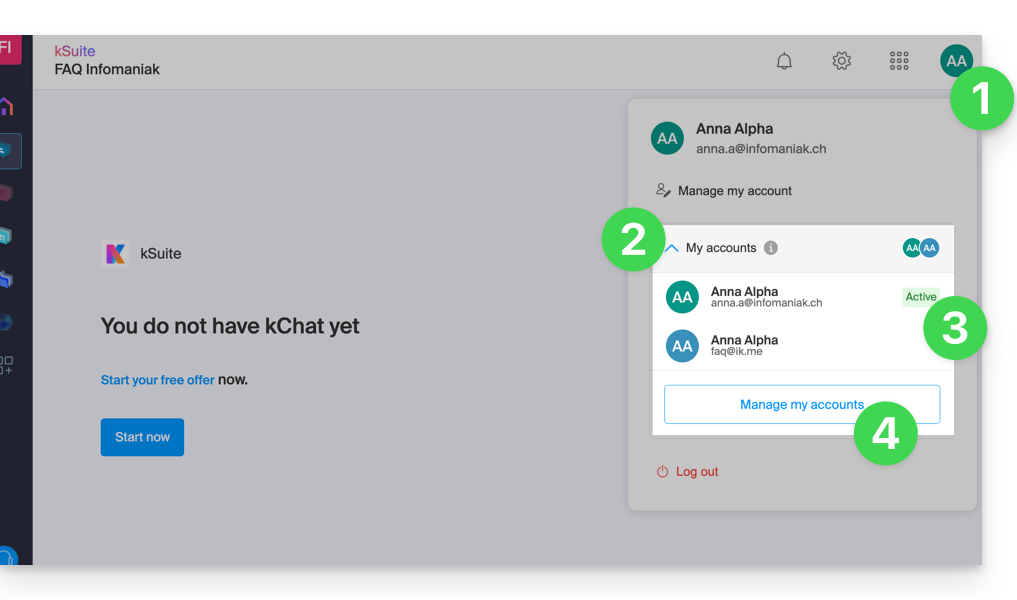
Once you have logged in with multiple different users from the same device, you will be able to find your different Infomaniak accounts and switch from one to the other:
- Click on the badge with your initials / avatar at the top right of the Infomaniak Manager.
- Click on the chevron My accounts to expand the memorized accounts.
- Click on an inactive account to switch to it.
- Click on the Manage accounts button to add or remove one of your accounts (read from point 4 of the chapter above):
If your user is linked to multiple Organizations, they can simply switch from one to the other without having to log out and log back in.
Link to this FAQ:
Has this FAQ been helpful?
This guide explains how to add a Client as part of the Infomaniak Partner Program.
Prerequisites
- Only the legal representatives of the Partner Organization are authorized to add Clients.
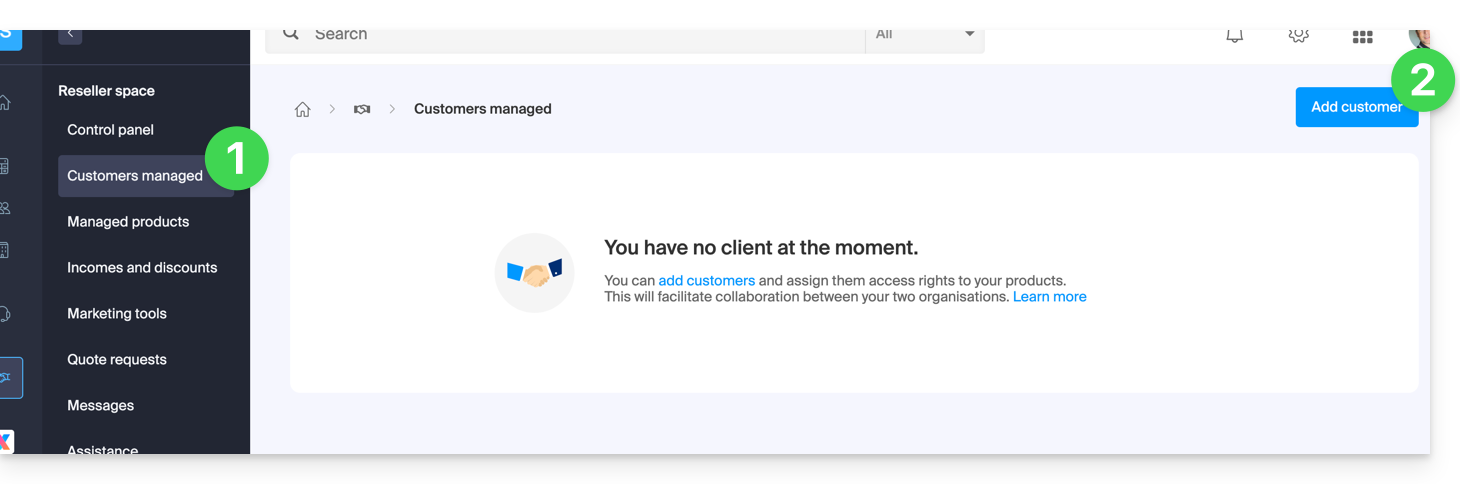
Add a "managed" Client
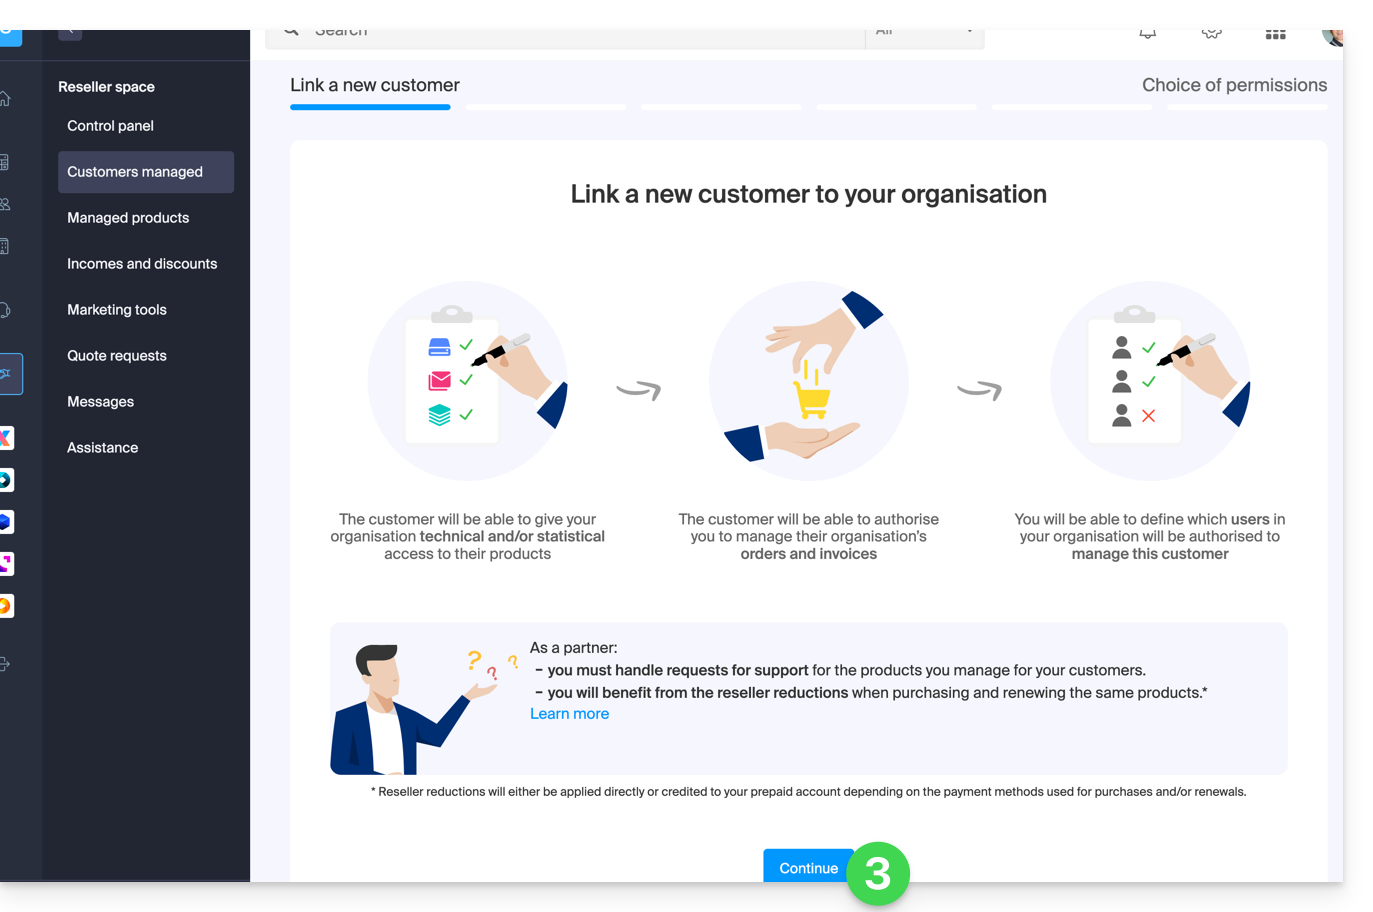
To add a Client as part of your Partner activity:
- Click here to access your managed Clients on the Infomaniak Manager Reseller Space (need help?).
- Click the blue “Add a client” button at the top right:
- Follow the procedure to complete:
- The pending request will be visible on your Manager:
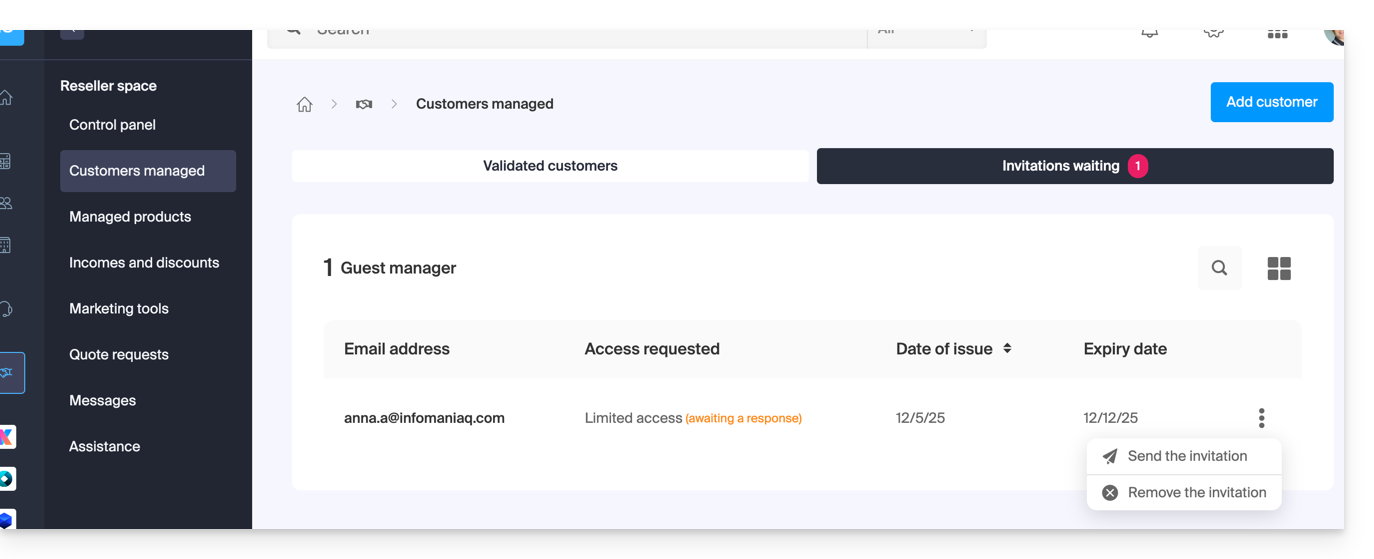
- The Client will receive an email with the request for different accesses and will have the option to decide to grant different access rights than those requested by the Partner.
- Once the invitation is accepted by a Client, check the access rights granted as well as the payment methods used (if applicable) on your Client's profile.
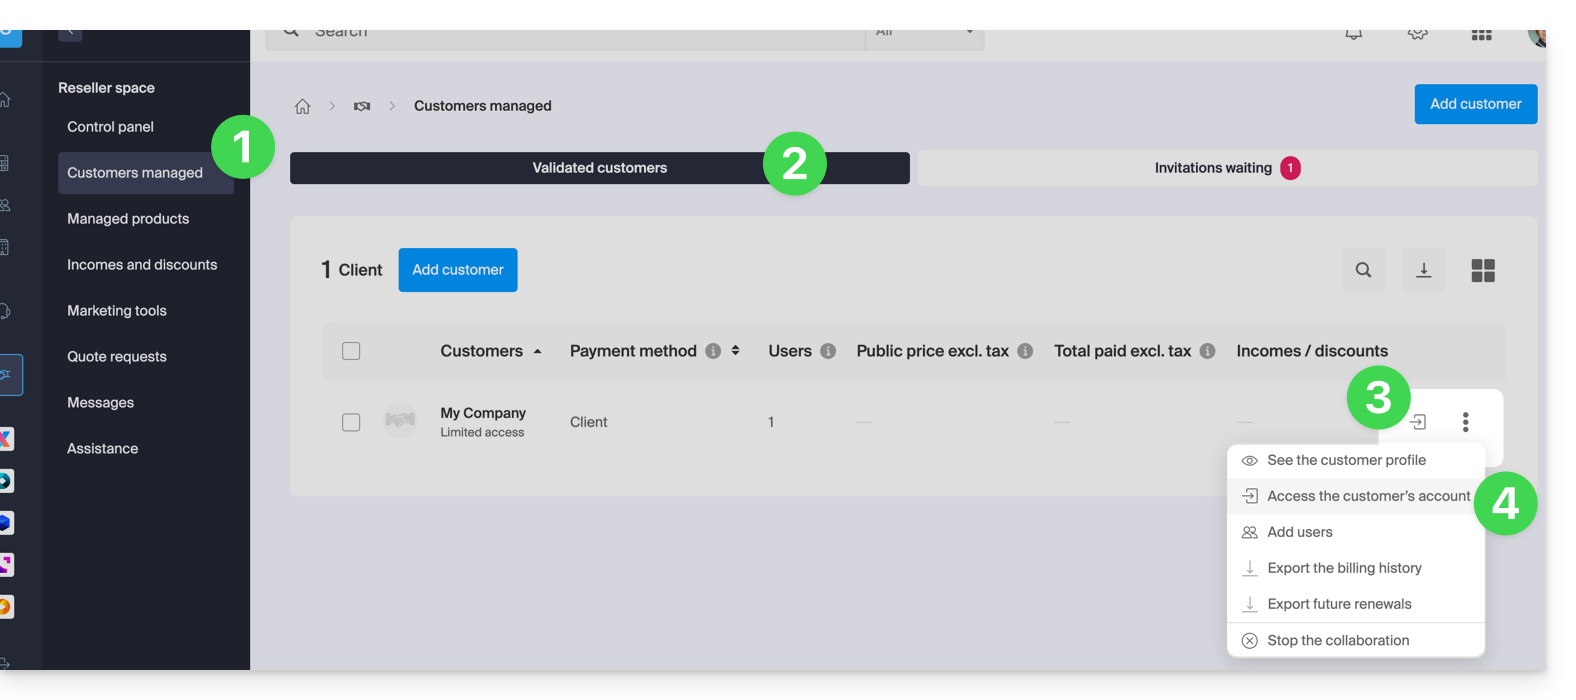
Access the Client's account and their products…
… as a legal representative or Partner administrator
- Click here to access your managed Clients on the Infomaniak Manager Reseller Space (need help?).
- If necessary, click on the tab for validated Clients.
- Click on the icon to the right of the Client concerned in the displayed table to access their Manager.
- Click on the action menu ⋮ to the right of the Client concerned in the displayed table to access more options (such as exporting data to a CSV file (format .csv) for example):
… as a Partner Organization collaborator
- Click here to access the Infomaniak Manager.
- Click on the chevron at the top left of your left sidebar menu.
- Click on the Clients tab.
- Click on the Client concerned in the displayed menu to access their Infomaniak Manager:

Link to this FAQ:
Has this FAQ been helpful?
This guide explains how to grant access to a Partner (among the Partners referenced by Infomaniak) to the products of your Organization present on the Infomaniak Manager, that is, the administration interface of your products.
Preamble
- If the Partner was already linked to the Client's Organization before the invitation, for example as an external user, their status is updated once the partnership begins.
- The pending invitation can be resent or deleted before acceptance by clicking on Partner in the left sidebar of the Client's Manager:
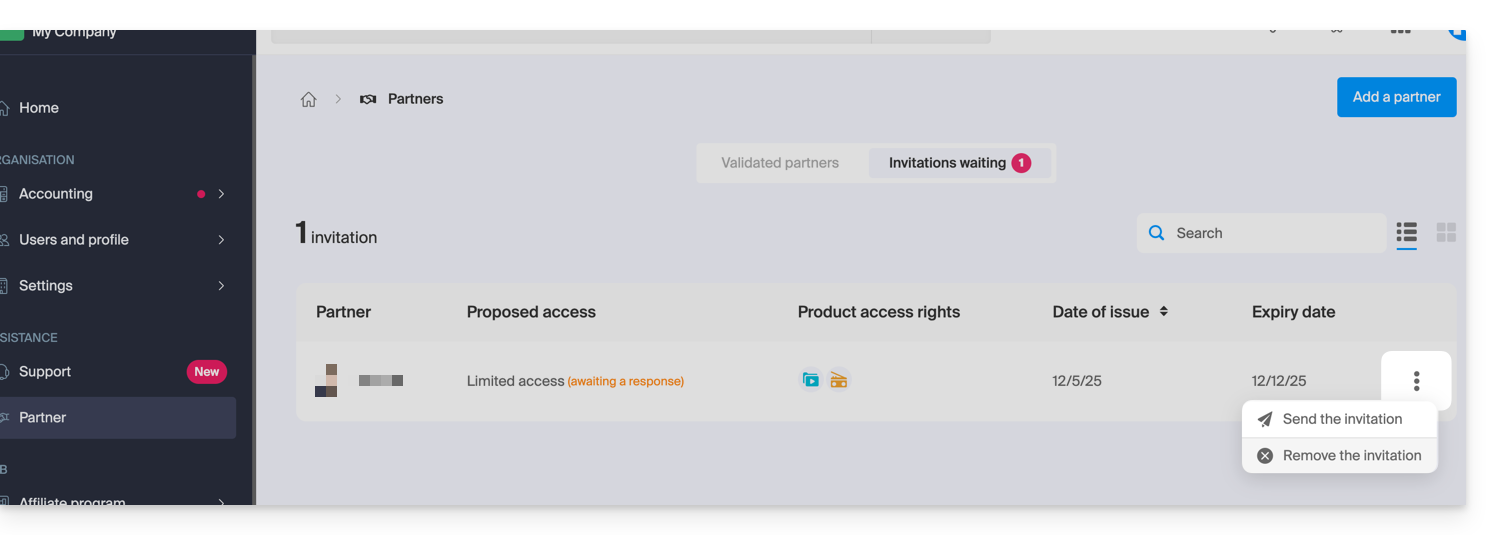
- At any time a partnership can be terminated.
As a Client, add a known Partner
Prerequisites
- Be Legal Representative within the Organization.
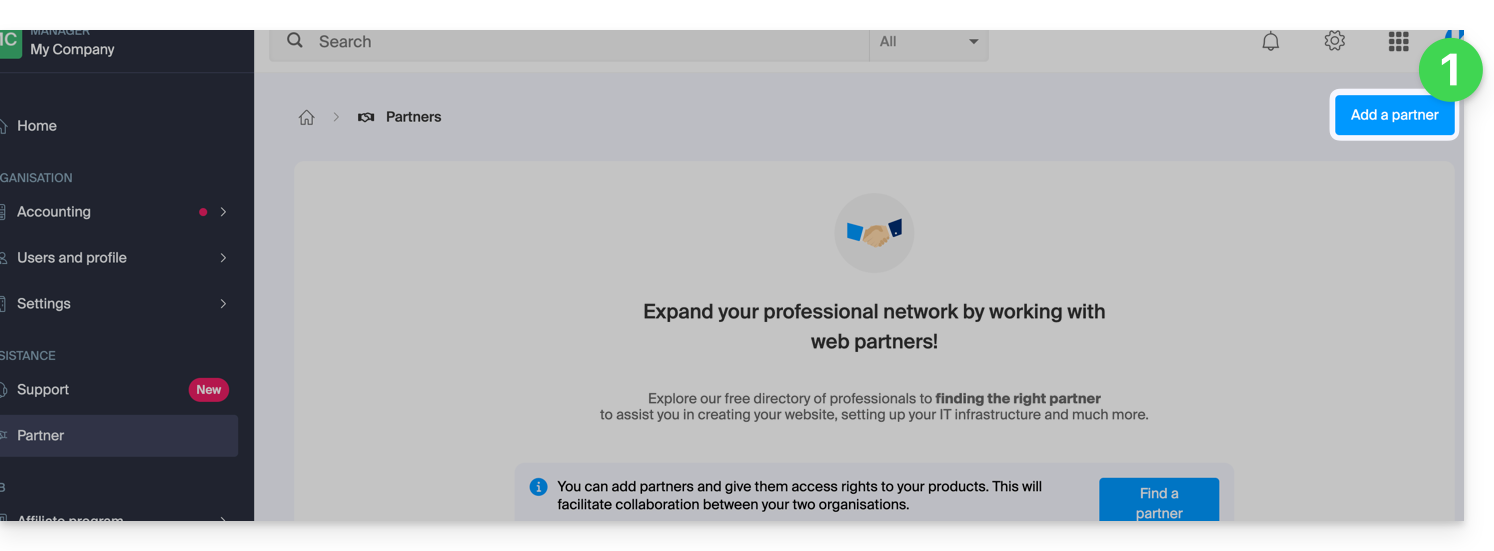
To authorize access to a Partner for some of your products:
- Click here to access adding a Partner on the Infomaniak Manager (need help?):
- Enter the name or email address of the Partner to whom you will grant access.
- Check the box to select the Partner from the search results.
- Click the blue button to Continue:
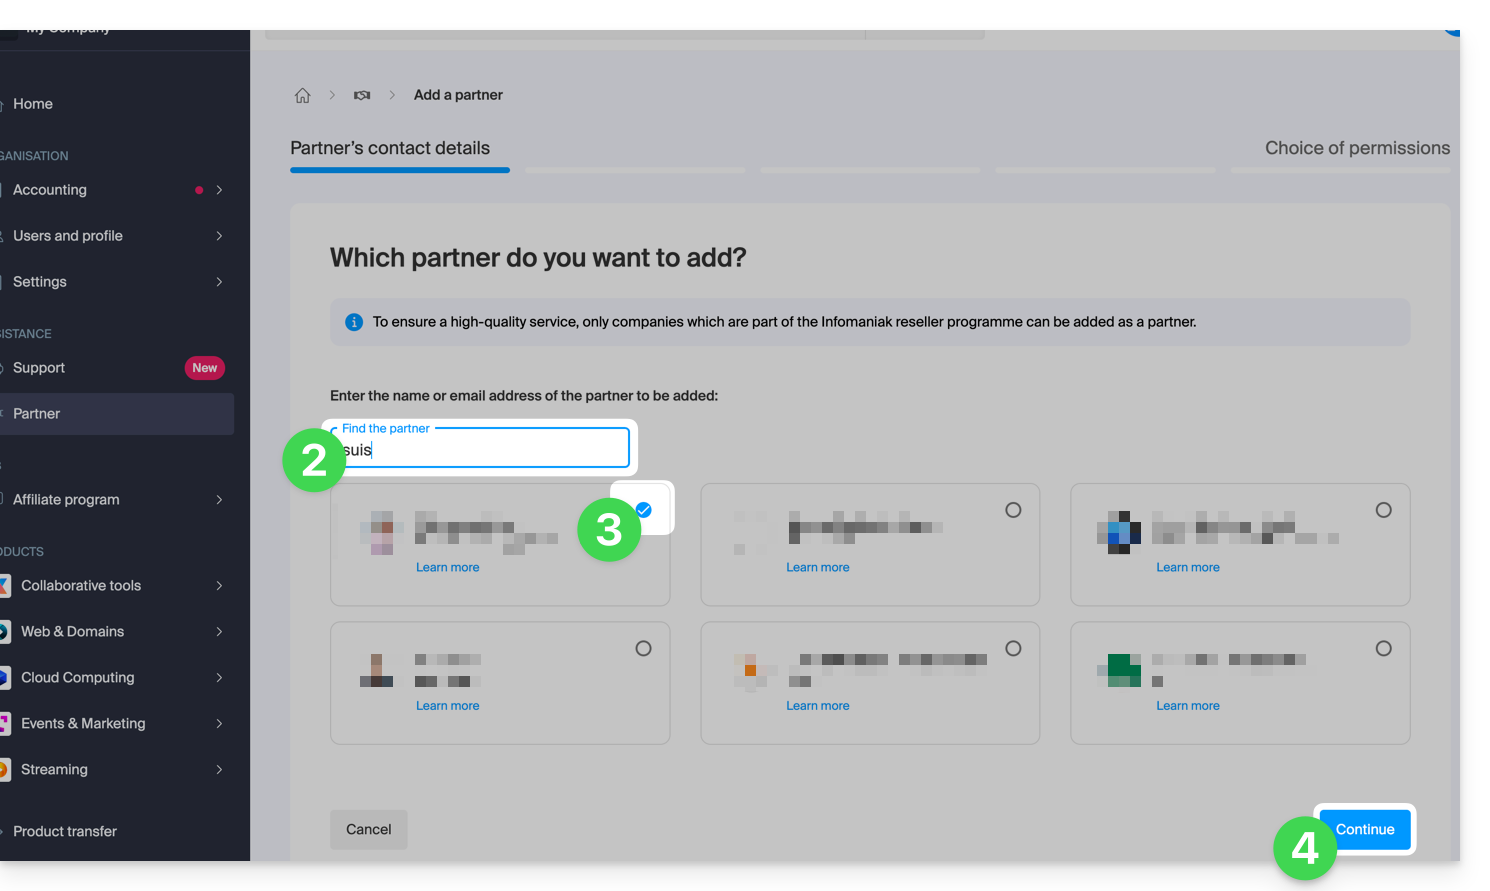
- The next step offers an important choice regarding the permissions granted to the Partner; the 2 possibilities are detailed below...
Grant the Partner access...
...limited
- Click the left button to choose to give the Partner limited access:
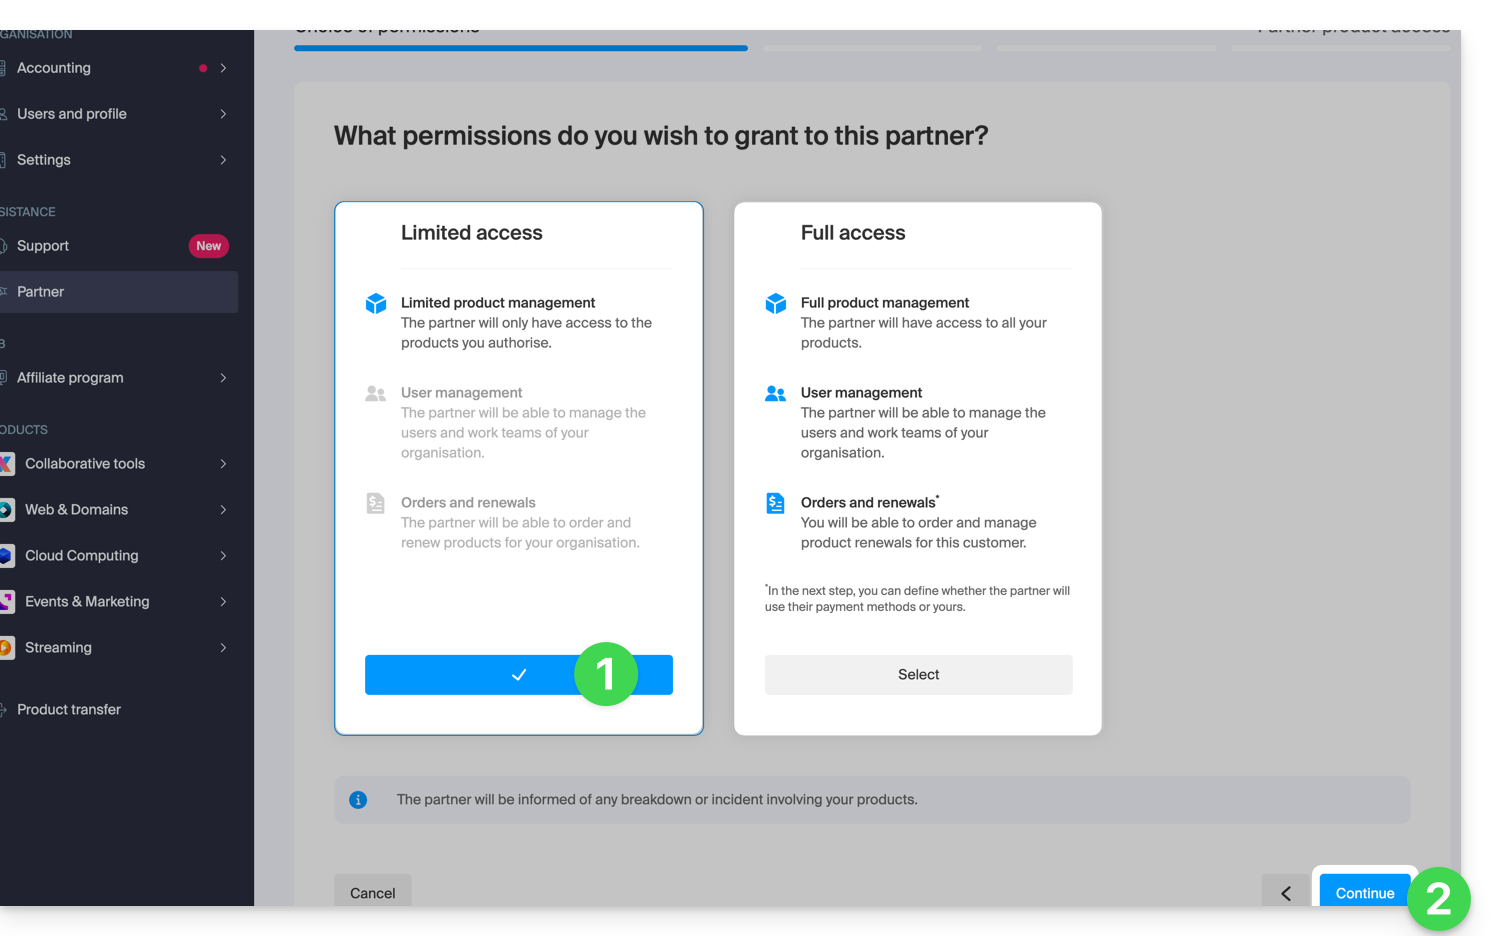
- Click the button to Continue.
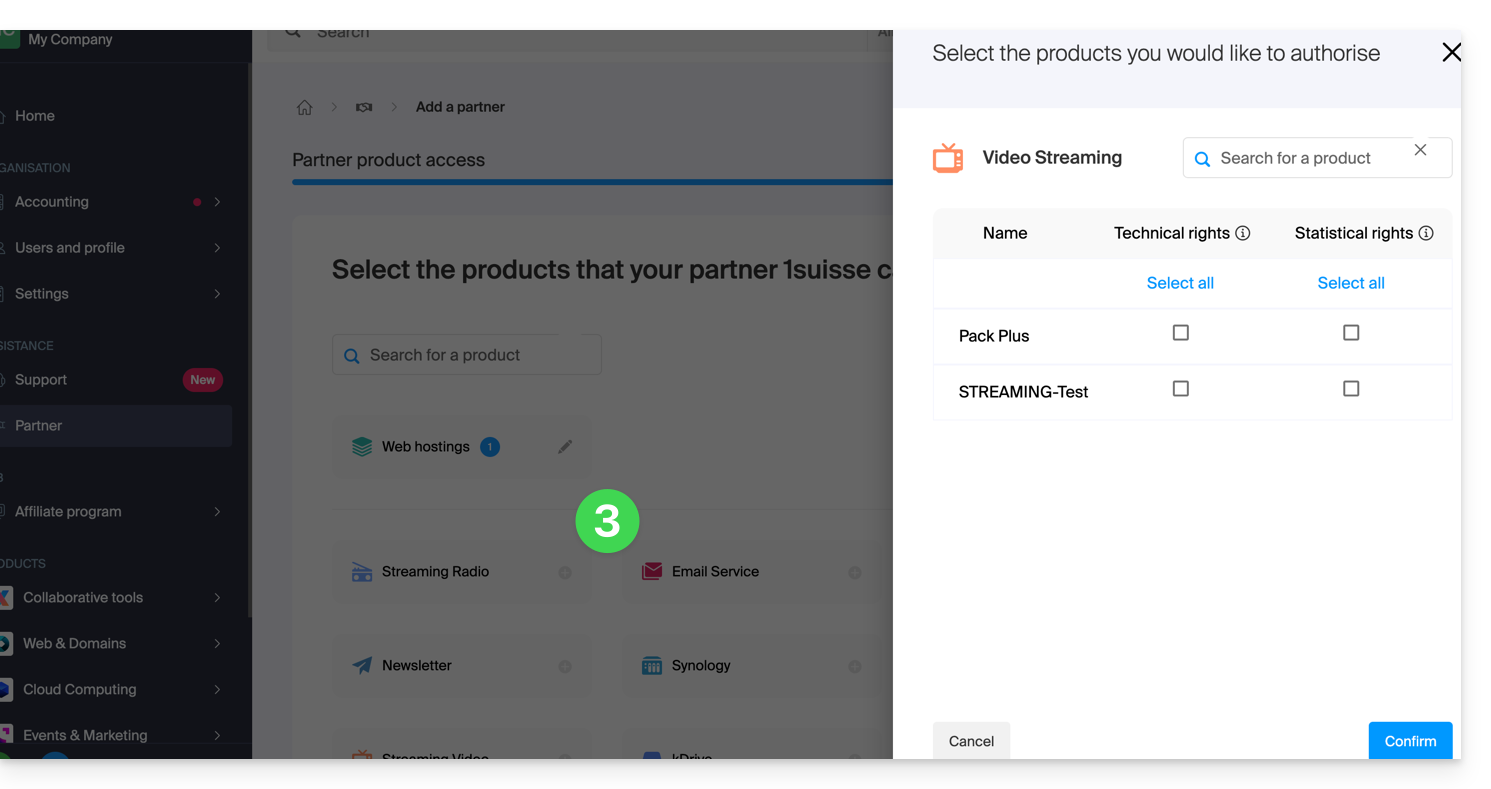
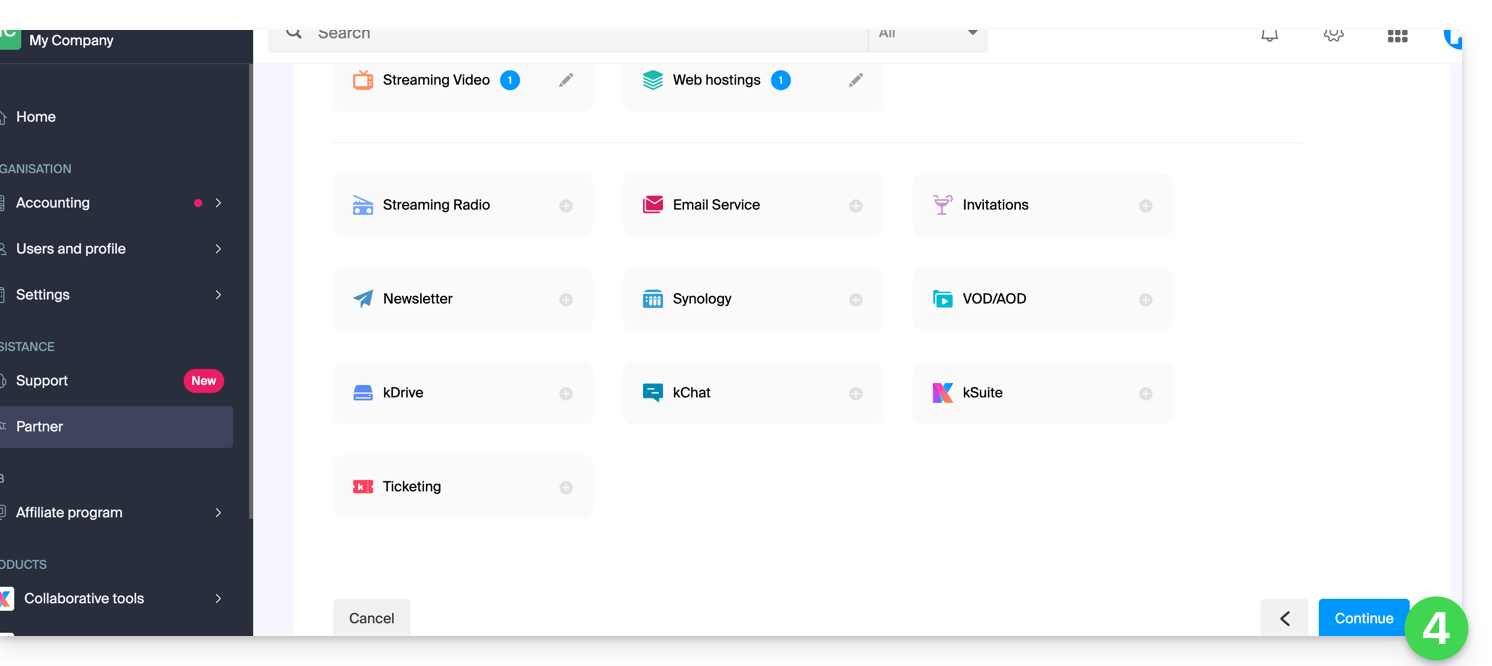
- Click on the category of the product concerned, then, in the panel that opens, on the product concerned; repeat for all the different products to which you want to grant access:
- Click the blue button at the bottom right to Continue:
- An email is automatically sent to the invited Partner containing a link that allows them to accept (or refuse) the management proposal:
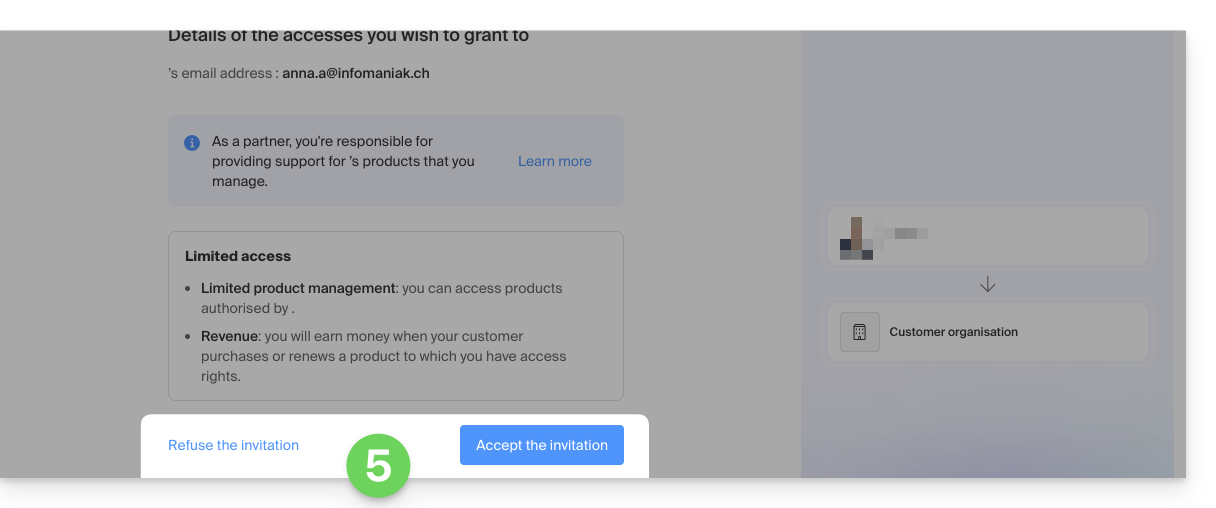
- Once the proposal is accepted, the Partner dashboard provides access to the Client's Organization and the products for which access rights have been granted.
... complete
- Click the right button to choose to give the Partner complete access.
- Click the blue button at the bottom right to Continue:

- The Client must choose whether to also entrust their wallet to the Partner.
- Click the blue button at the bottom right to Continue:
- An email is automatically sent to the invited Partner containing a link that allows them to accept (or refuse) the management proposal:
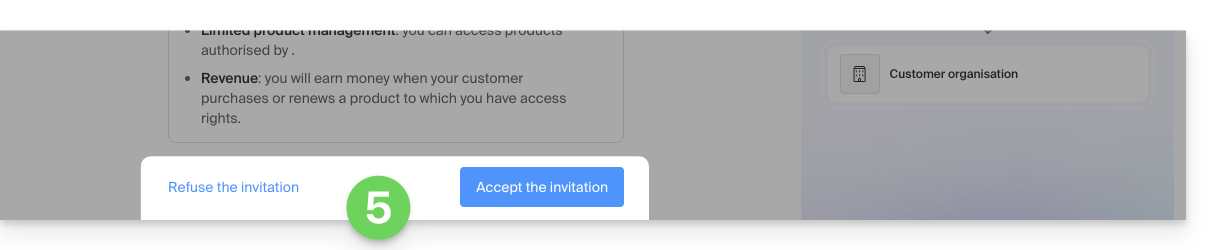
- Once the proposal is accepted, the Partner dashboard provides access to the entire Client's Organization.
Link to this FAQ:
Has this FAQ been helpful?
This guide explains the differences between the two types of access authorization available when the Partner wants to start a partnership by choosing the Client they will manage.
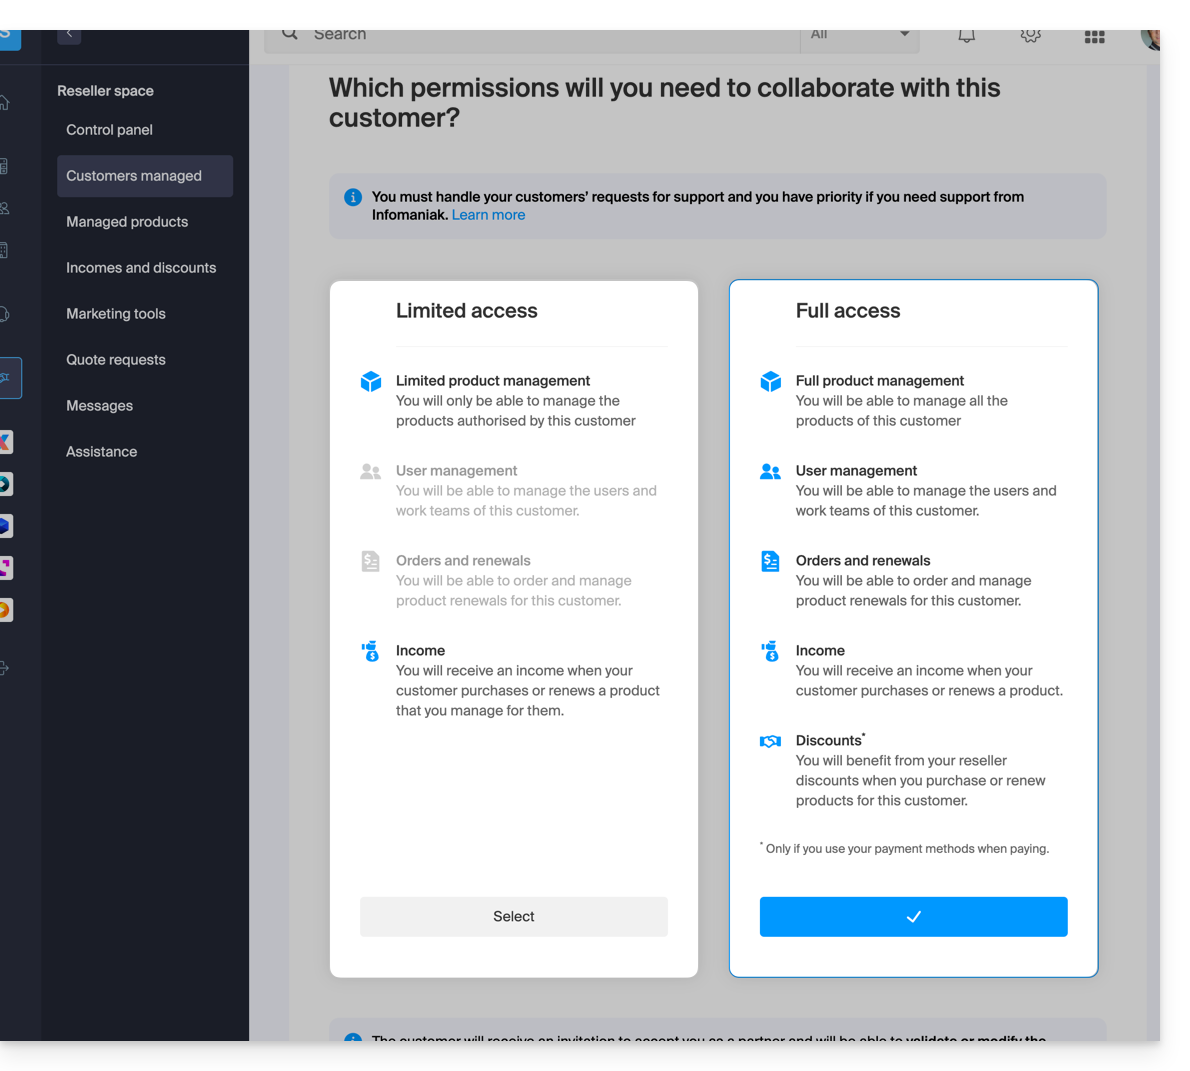
Limited access
When making this choice:
- The Client
- grants their Partner access to specific products
- can have multiple Partners with limited access to their Organization, provided they manage different products
- The Partner
- manages only the products for which the Client has granted them management (Limited product management)
- can manage the Client's users and work teams (User management)
- cannot order and renew products for their Client (Orders and renewals)
- earns revenue when the Client makes purchases or renews products for which the Partner has management (Revenue)
Full access
When making this choice:
- The Client
- grants their Partner access to all their products (Full product management)
- can have only one Partner with full access to their Organization
- The Partner
- can manage the Client's users and work teams (User management)
- can order and renew products for their Client (Orders and renewals)
- earns revenue for any product order or renewal (Revenue)
- benefits from reseller discounts when purchasing or renewing products for their Client, but only if they use their own payment methods (Discounts)
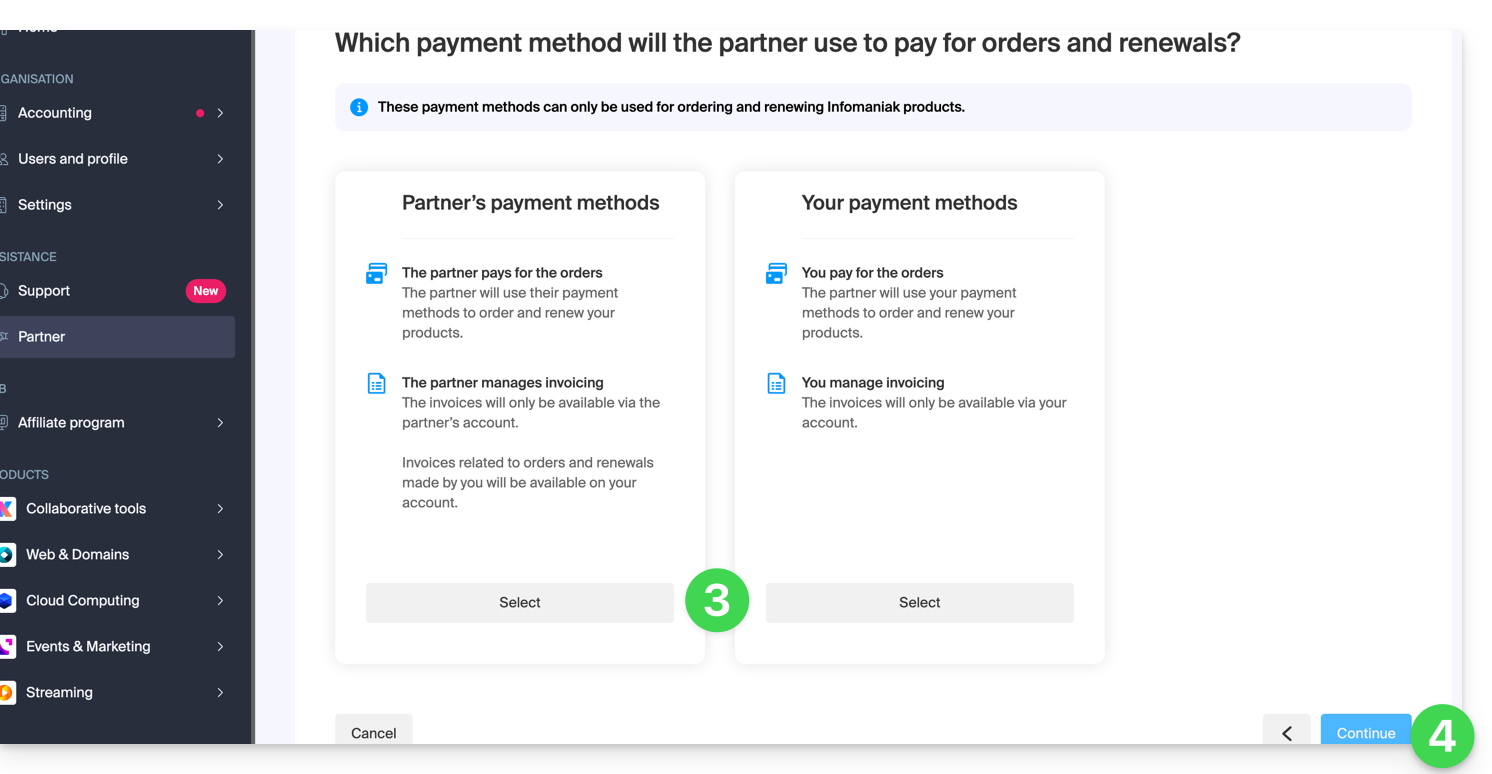
- The Client & the Partner can define which payment methods will be used for orders and renewals (Payment methods)
The type of authorization granted to the Partner can be modified at any time, and only by the Client.
Link to this FAQ:
Has this FAQ been helpful?
This guide explains how a Client can adjust the access rights granted to an Infomaniak Partner so that the latter can access the products more broadly, or no longer access them at all.
Prerequisites
- Have authorized a Partner to access your products (and thus become the Client of a Partner).
- Understand the differences between the 2 types of permissions that can be defined from the Manager.
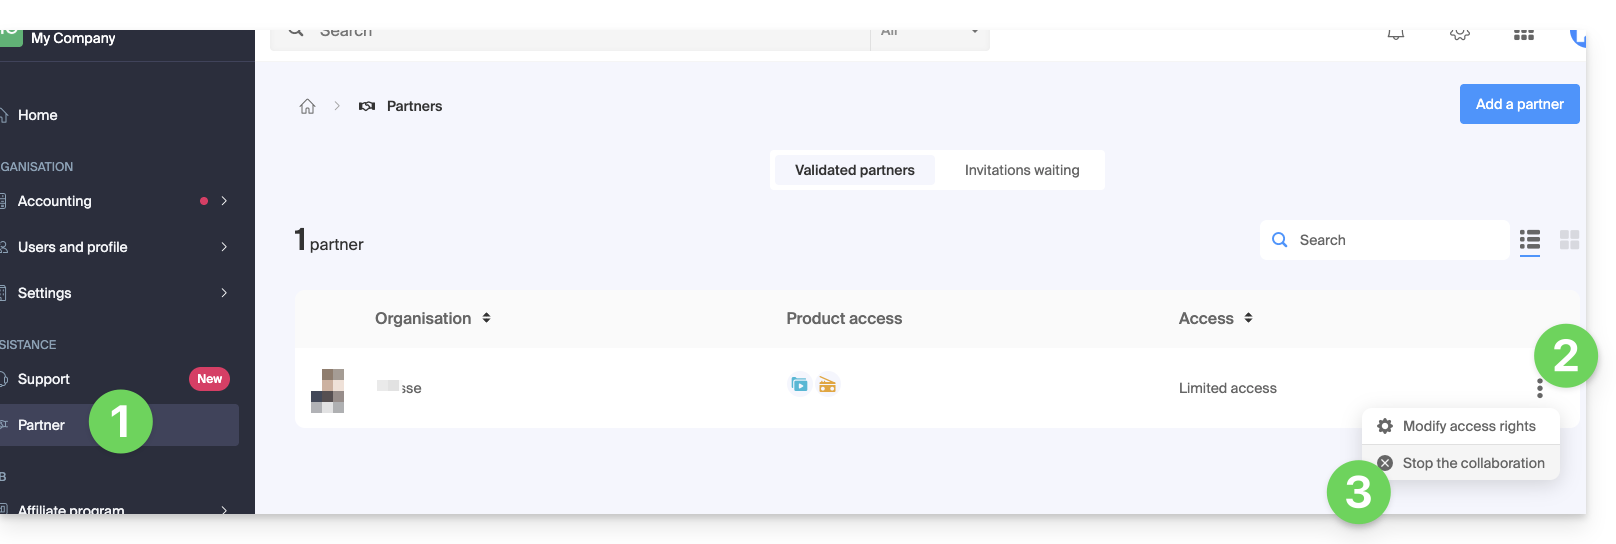
Modify the Partner's access to your products
To grant new access to the Partner as a Client:
- Click here to access the management of your partnerships on the Infomaniak Manager (need help?).
- Click on the action menu ⋮ to the right of the Partner concerned in the table that appears.
- Click on Modify access rights:

- Click on the type of access rights you wish to grant (
limited to a selection of productsorfull access):
- Click on the blue Continue button and follow the assistant to the end.
Remove the Partner's access to your products
To cut access to a product to a Partner:
- Click here to access the management of your partnerships on the Infomaniak Manager (need help?).
- Click on the action menu ⋮ to the right of the Partner concerned in the table that appears.
- Click on Modify access rights.
- Switch if necessary to the limited management of your products:

- Select or deselect the products concerned within the different product categories:

- Continue to confirm the removal of access.
You can also completely stop the collaboration with an Infomaniak Partner.
Link to this FAQ:
Has this FAQ been helpful?
This guide helps you understand the concepts of recurring rebate and cashback (revenue) within the framework of the Infomaniak Partner Program.
Prerequisites
- Understand the differences between the 2 types of authorizations linking a Client to the Partner, which can be defined from the Manager.
- Understand the differences between the 2 types of payment methods linking a Client to the Partner, which can be defined from the Manager.
Cashback
This is an amount equal to the difference between the public price and the preferential price that the Partner benefits from as an Infomaniak reseller.
This amount is refunded as cashback to the Partner's prepaid account in the following cases:
Full access partnership (Client's payment methods)
- When the Client places an order or renews a product.
- When the Partner places an order or renews a product on behalf of their client using their client's payment methods.
Full access partnership (Partner's payment methods)
- When the Client places an order or renews a product.
Limited access partnership
- The Client places an order or renews a product that the Partner manages.
Rebate
A Partner benefits from rebates on orders and renewals due to their status as an Infomaniak reseller. The rebate applies in the following case:
Full access partnership (Partner's payment methods)
- When the Partner places an order or renews a product on behalf of their client using their own payment methods.
Accumulation
The rebate is combined with the degressive rate of Web/Mail hosting.
With 35 web hostings, you pay for example only CHF 208.32 / month excl. VAT per hosting instead of CHF 347.20, which represents a total reduction of -40%.
Calculation details in CHF (excl. VAT):
- Regular price for 35 Web Hostings: CHF 347.20
- With 20% Partner Discount: CHF 277.76
- Final partner rate with 25% decreasing rate: CHF 208.32
Calculation details in euros (excl. tax):
- Regular price for 35 Web Hostings: 201.25 €
- With 20% Partner Discount: 161.00 €
- Final partner rate with 25% decreasing rate: 120.75 €
The decreasing rate (-25%) is therefore applied to the remaining amount after the partner discount (-20%).
Link to this FAQ:
Has this FAQ been helpful?
This guide explains how to terminate a partnership between a Client and a Partner as part of the Infomaniak Partner Program.
Stop the partnership...
... as a Client
To do this:
- Click here to access the management of your partnerships on the Infomaniak Manager (need help?).
- Click on the action menu ⋮ to the right of the Partner concerned in the table that appears.
- Click on Stop the collaboration:
- Confirm the removal of the Partner for the first time.
- Definitely validate by entering the Infomaniak account password.
- The partnership has been successfully terminated.
... as a Partner
To do this:
- Click here to access your Managed Clients on the Reseller Space of the Infomaniak Manager (need help?).
- Click on the action menu ⋮ to the right of the Client concerned in the table that appears.
- Click on Stop the collaboration:
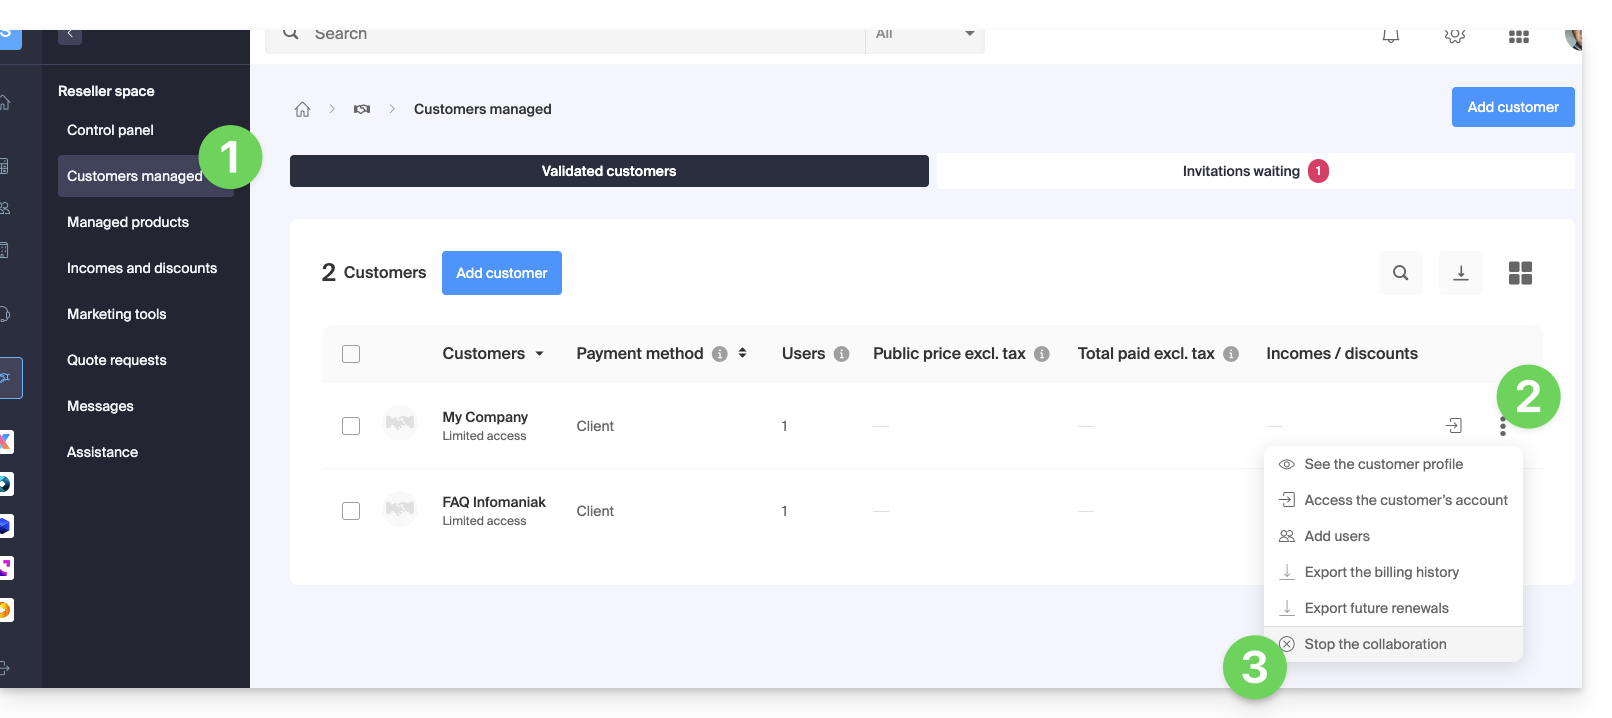
- Confirm the removal of the Client for the first time.
- Definitely validate by entering the Infomaniak account password.
- The partnership has been successfully terminated.
Link to this FAQ:
Has this FAQ been helpful?
This guide explains the differences between the two types of payment modes possible within a partnership (with full access granted to the partner).
Indeed, in the context of adding a Partner for managing your products, if you grant all rights, you will need to decide whether to also entrust them with the entire billing part.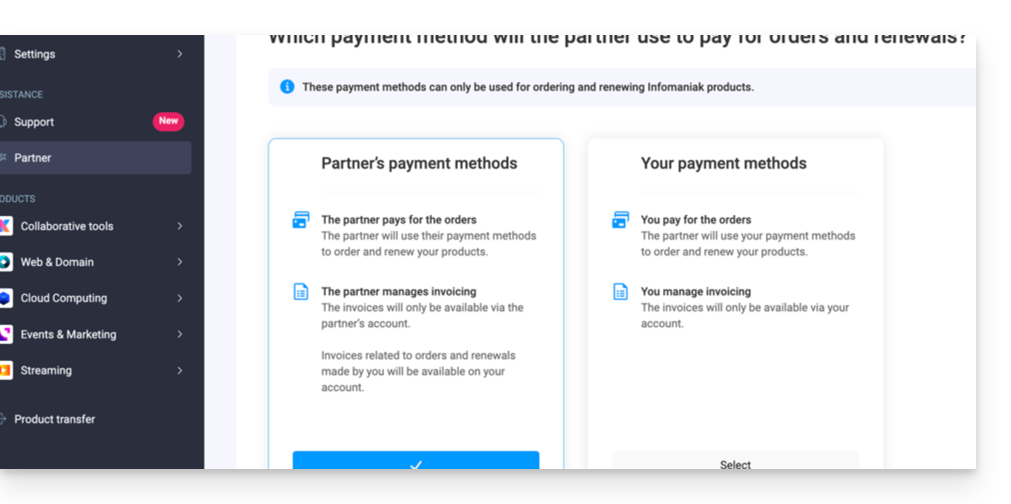
Payment modes ...
... of the Customer
In this case:
- The Customer manages billing and pays for orders and renewals made by the Partner.
- The Partner:
- Pays the public price and will receive income (cashback) in their account depending on the benefits they receive as an Infomaniak reseller
- Also receives income (refund) for any order and renewal made directly by their client.
- Invoices will only be accessible within the Customer's organization, and the Partner will not have access.
- The products will be installed directly within the Customer's Organization.
... of the Partner
In this case:
- The partner
- Manages billing and pays for orders and renewals made for their client
- Benefits directly from reseller discounts when ordering and renewing on behalf of their client
- Also receives income (refund) for any order and renewal made directly by their client.
- Invoices will only be available within the Partner's organization, and the Customer will not have access.
- The products will be installed directly within the client's organization.
Change the payment mode
When granting full access to an associate, the Customer can change the type of payment mode used in the partnership at any time:
- Log in to the Infomaniak Manager (manager.infomaniak.com).
- Click on Partner in the left sidebar menu.
- Click on the name of the partner concerned:

- Click on the pencil icon at the top of the page to the right of Payment:
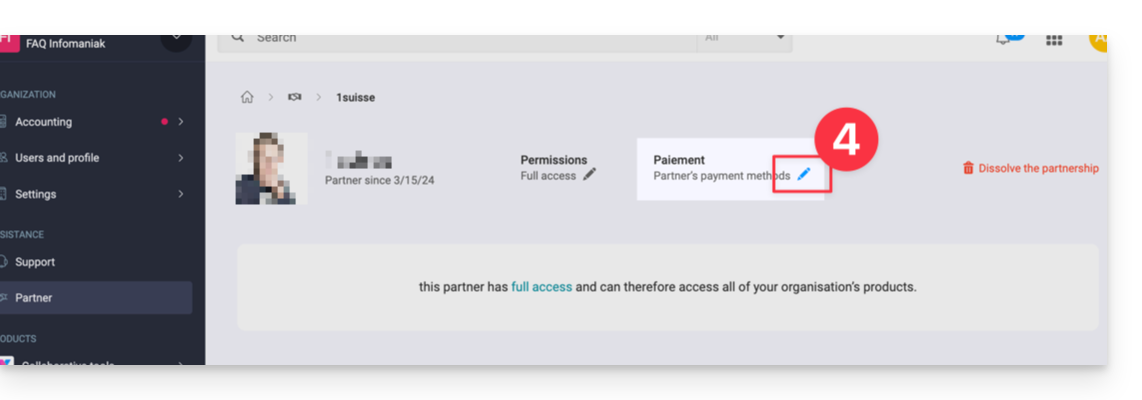
- Modify and verify the desired information.
The Partner will receive a notification of the change by email.
Also refer to this other guide.
Link to this FAQ:
Has this FAQ been helpful?
This guide helps you resolve connection errors on Infomaniak mobile applications (kDrive, Euria, SwissTransfer, Mail) when the security message "your device is not recognized as safe" appears on Android.
Connection issues "Your device is not recognized as safe"
This blockage is related to Google's security protocols (Google Play Integrity API). Infomaniak uses these standards to ensure that data is not accessed on a device whose security could be compromised.
This usually occurs in the following cases:
- Use of an unofficial operating system (Custom ROM / LineageOS).
- Rooted device or unlocked bootloader.
- Android version too old or not certified by Google.
- Certain smartphone models (e.g.: Huawei without official Google services).
Immediate workaround
If your device is healthy but the message persists, you can bypass the blockage by forcing a new manual authentication:
- On the application login screen, click on the down arrow/chevron icon next to your account or avatar.
- Select the option "Log in with another account" (even if it is the same account).
- Enter your credentials manually (Infomaniak email address and password).
This method allows you to ignore the previous connection token and validate access via a new secure session.
Link to this FAQ:
Has this FAQ been helpful?
This guide explains how to regain access to Infomaniak services (manager.infomaniak.com and ksuite.infomaniak.com/mail among others) if you encounter issues with the kAuth mobile app (application for iOS/Android smartphones or tablets) if this is the security method you chose during 2FA activation (two-factor authentication).
Before changing your mobile device
If you plan to change your iOS/Android device on which the kAuth app is installed, before doing so:
- Log in one last time with 2FA on the Infomaniak Manager.
- Remove security temporarily (or modify the verification method to receive a code by SMS, for example).
- Then on the new device, install and open the kAuth mobile app to re-authenticate with 2FA via kAuth!
After changing your mobile device
If it's too late and you haven't followed the method above, check in the kAuth mobile app if your account is still present; it may be that you no longer receive the connection authorization request notification YES/NO and in this case:
- Open the mobile app kAuth (application for iOS/Android smartphones or tablets) on your device.
- Press on the account concerned.
- Note the temporary code displayed.
- Enter this code on the login page for the Manager.
- Once logged in, deactivate two-factor authentication.
- Then reconfigure two-factor authentication by choosing kAuth and adding your account to the mobile device which will reactivate the notifications.
If it's too late, and no accounts are displayed in the kAuth mobile app, there's no need to call Infomaniak or add your account in the app (without having followed the first explanation at the top of this guide), the registration will loop since a code will be requested...
And in this case, no choice, you will need to provide a number of security elements manually or via the app Infomaniak Check (kCheck) to regain access to your account:
- Click here to access the Infomaniak Manager login page.
- Enter the username and correct password.
- When prompted for additional authentication, click on alternative methods:
- Choose to enter one of your recovery codes if you had downloaded the sheet during 2FA activation:
- Otherwise select the last option to request assistance to access the form allowing you to submit your ID documents and recognition selfie:

- Follow the procedure to the end and wait:

Link to this FAQ:
Has this FAQ been helpful?
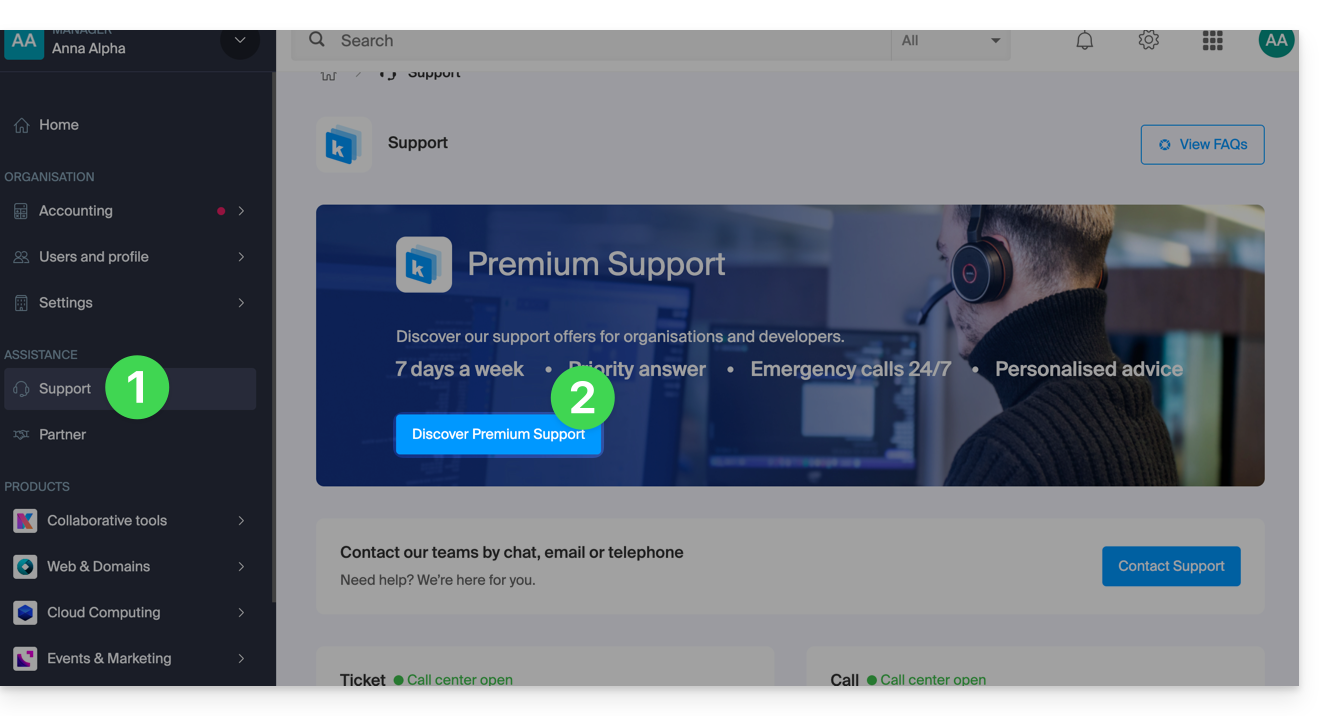
This guide helps you subscribe to the Premium Support Infomaniak.
Discover Premium Support
To manage your Premium Support offer:
- Click here to access the management of your Organization's Support on the Infomaniak Manager.
- Click the button to start registration:
Link to this FAQ:
Has this FAQ been helpful?
This guide covers data protection regulations in Switzerland and Europe and the measures taken by Infomaniak to secure your customer data and data within Web Hosting and Mail Services.
Understanding the difference between data security and data confidentiality
Data security aims to prevent any unauthorized access to your information. It relies on measures such as encryption, firewalls, or VPNs. A security breach can have disastrous consequences: imagine if a hacker steals your entire customer database and demands a ransom to recover it. This type of attack – ransomware – can paralyze a business overnight.
Data confidentiality concerns who can access your information and how it is used. Even if your data is secure against hacking, it can be collected, analyzed, and resold… legally.
Example: you carefully store your customers' information, but unbeknownst to you, a service you use shares – anonymously – this data with third parties. Result? Your competitors can obtain valuable analyses of your market and target your own customers without ever needing to hack.
LPD & GDPR
In Switzerland, the LPD (Federal Data Protection Act) and nLPD (for the "new Law" in effect since September 2023) protect the confidentiality of residents by regulating the collection and processing of personal data by organizations.
On the other hand, the GDPR (General Data Protection Regulation) of the EU, in effect since May 2018, influences global companies processing the data of European residents, including in Switzerland. While the LPD applies to the data of Swiss residents, the GDPR concerns that of EU residents. Swiss companies managing European data must comply with the GDPR requirements, including the designation of a Data Protection Officer and the conduct of Impact Assessments in case of risky processing.
Your role as an Infomaniak Client
Regarding the hosted data that belongs to you — and especially if it contains personal data of your visitors, contacts, or customers — it is your responsibility to ensure its compliance.
When processing this personal data, it is essential to inform users about the purpose and methods of this processing. This is usually done through a privacy policy or a data processing agreement (DPA).
Agreement between data controller and processor
A DPA (Data Processing Agreement), called in German AVV (Auftragsverarbeitungsvertrag), in Italian ATD (Accordo di Trattamento dei Dati) and in Spanish CTA (Contrato de Tratamiento de Datos), translates to Data Processing Agreement or Personal Data Processing Contract.
It is a mandatory contract provided for by the GDPR between a data controller and a processor. It defines the purpose, duration, and nature of the processing, as well as the obligations and security measures. Its objective is to protect the personal data entrusted to a service provider.
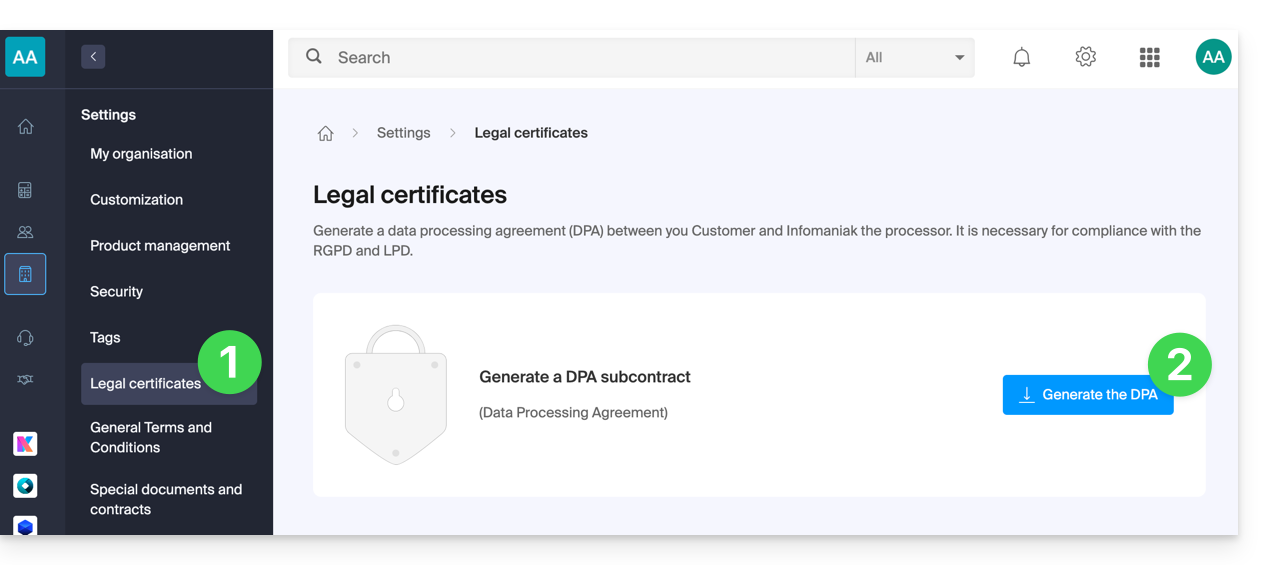
This GDPR certificate (in PDF format) can be generated and downloaded from the Manager (accessible to organization users who are owners or administrators):
- Click here to access DPA management on the Infomaniak Manager (need help?).
- Click the Generate button to download the customized PDF document:
Here are some tips on this subject:
- Inform about all data processing, not just those related to the website.
- Ensure easy access to the privacy statement on the website, for example in the footer of each page.
- In general, it is not necessary to obtain the user's approval for privacy statements (e.g., for forms); it is sufficient to indicate where to find the statement (example Site Creator).
- Keep in mind that new, more in-depth information rules may require adjustments to existing privacy statements.
It is crucial to differentiate between the security of the infrastructure where your data is hosted and the management and implementation of your data. As a host, Infomaniak acts as a subcontractor for your GDPR obligations. In this context, its privacy policies and cookie usage, as well as its terms and conditions, provide the necessary guarantees regarding its compliance as a subcontractor.
If necessary, you can find professionals or online guides to help you through the compliance process.
Infomaniak's Role
Like companies that work with user data, Infomaniak must comply with the LPD and, because some of these users are European citizens, the GDPR as well:
- the data privacy policy details the data that Infomaniak retains to provide and execute its services
- the policy related to the protection of your personal data describes Infomaniak's commitments as a subcontractor that hosts all of your data, including personal data
These commitments, as outlined in the general terms and conditions and specific terms and conditions, are as follows:
- to keep your data within data centers located exclusively in Switzerland and to never transfer your information outside of these infrastructures
- to apply rigorous security standards and to continually improve processes to ensure a high level of security across all services
- to promptly inform you in case of a data breach
- to ensure transparency with you when Infomaniak uses subcontractors who may process your data
- to strengthen and develop physical security measures to prevent any unauthorized access to the infrastructures where your data is stored
- to implement physical and/or logical isolation systems (depending on the services) to separate the hosting of different clients; additionally, Infomaniak conducts annual penetration tests to ensure data integrity between clients
- to demonstrate a high level of reactivity in securing the systems under its responsibility
Manage cookies on the infomaniak.com site
When you visit the page infomaniak.com a choice must be made for the acceptance of certain cookies. To modify this choice later, access your preferences from the footer of the site: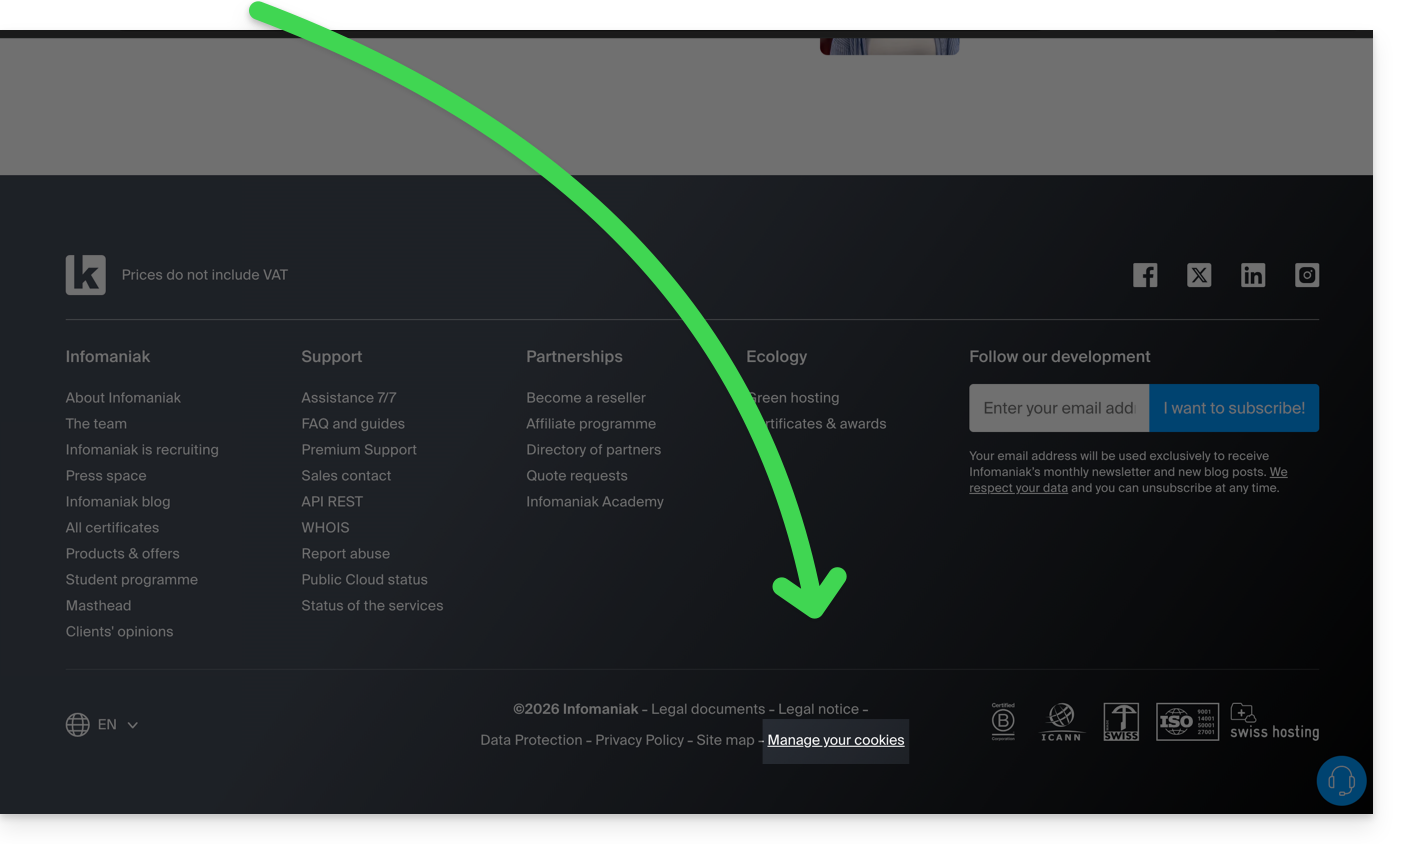
Link to this FAQ:
Has this FAQ been helpful?
This guide explains how to add, modify, or remove users from an Organization within the Manager Infomaniak.
Preamble
- Since you opened your account with Infomaniak, you are part of at least one Organization.
- If you were alone and it was not an invitation, an Organization was created in your name and you automatically become the legal owner.
- Otherwise, you belong to the Organization that invited you (to join its kSuite, to manage a product, etc.).
- Only an owner/legal owner can make changes.
- A potential collaborator who also has access to your Organization will not be able to make changes from their restricted account.
Add a new user
As an Organization user with sufficient rights, you can:
- add a new user.
- This can be someone completely external to Infomaniak,
- or someone who already has their own Infomaniak user account that they can reuse if they wish by extending it to your Organization.
When adding, you can:
- specify their role within the Organization,
- the products they will have access to,
- as well as the administrative contact preferences.
Remove a user
As an Organization user with sufficient rights, you can:
Modify a user's permissions/rights
As an Organization user with sufficient rights, you can:
- modify another user's role,
- manage the products they have access to, and the more specific permissions if it is access to an email address, for example,
- as well as the administrative contact preferences whether they are yours or those of others.
Replace a legal owner
To change the legal representative of an Organization in the Manager, it is necessary to remove the user who has the role of legal representative, which implies appointing a new legal representative beforehand (indeed, it is impossible to remove a legal representative if there is no other legal representative for the Organization).
Manage users in work teams
You can organize the Organization's users within work teams.
Link to this FAQ:
Has this FAQ been helpful?
This guide covers the management of application passwords from the Infomaniak Manager.
Preamble
- Application passwords allow you to establish an authenticated connection between certain tools & services even if the two-step validation (2FA authentication) is activated.
- To synchronize, for example, contacts & calendars from your Infomaniak account with a mobile device or email software/client, perform the actions presented in the guide below to generate a new password specific to this application.
- It is possible to generate multiple specific passwords (for example 1 for the contacts and 1 for the calendars) or to use the same one for synchronizing both services.
Create an application password
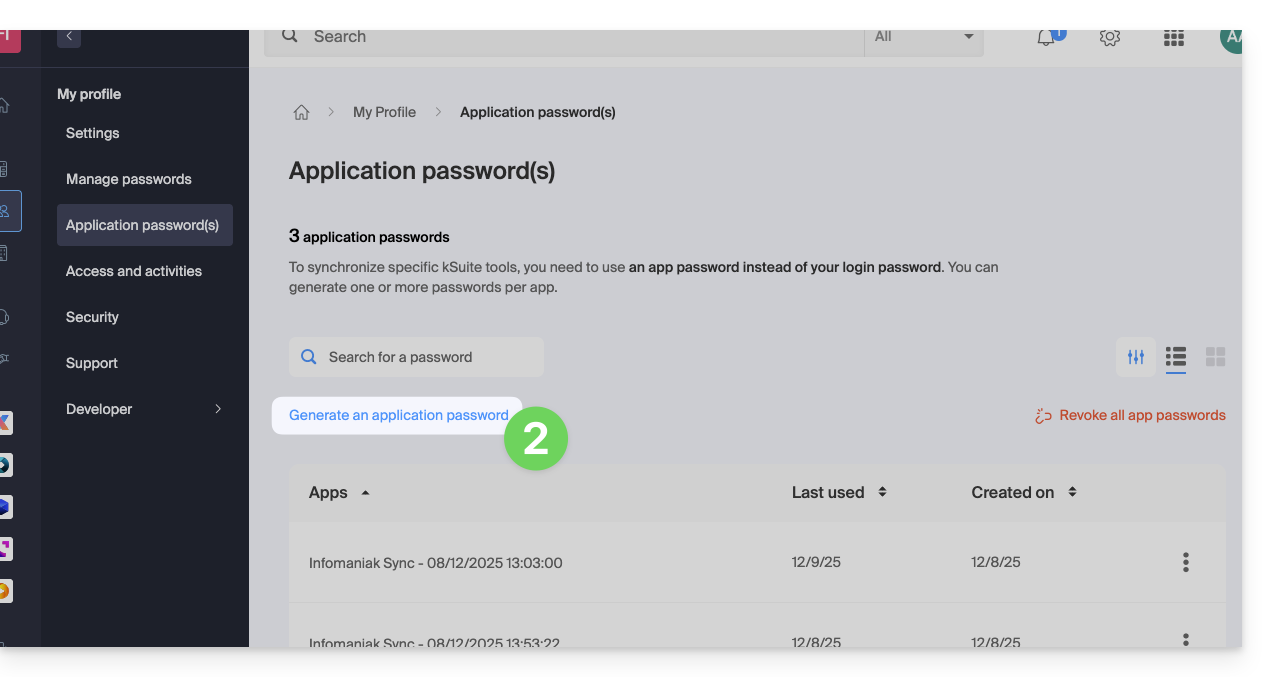
To do this:
- Click here to access the management of application passwords on the Infomaniak Manager.
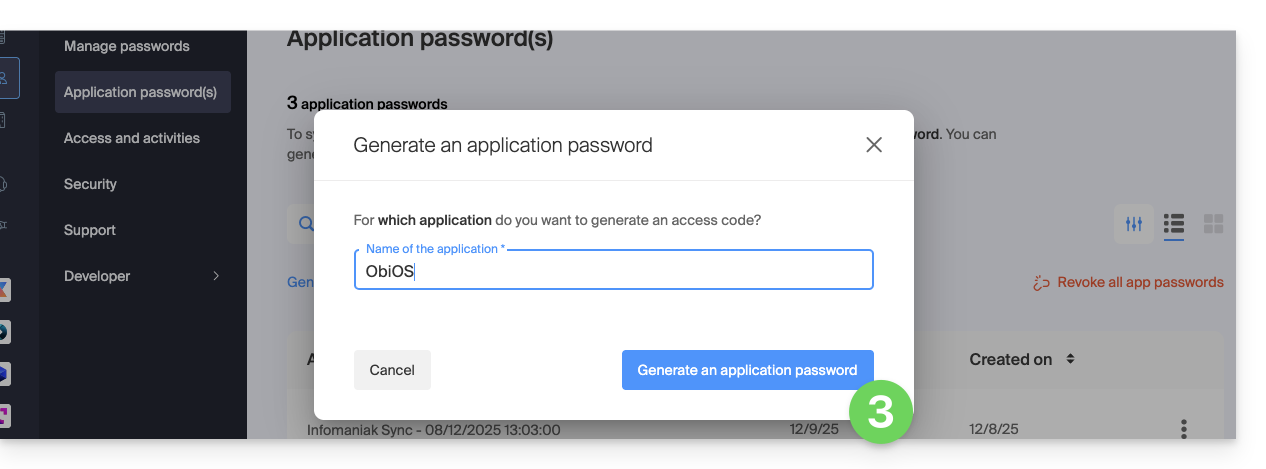
- Click on Generate an application password:
- Enter a name for the application password in the dialog box, then click on Generate an application password:
- Copy and save the generated application password in a safe but accessible place, it will no longer be accessible once the window is closed.
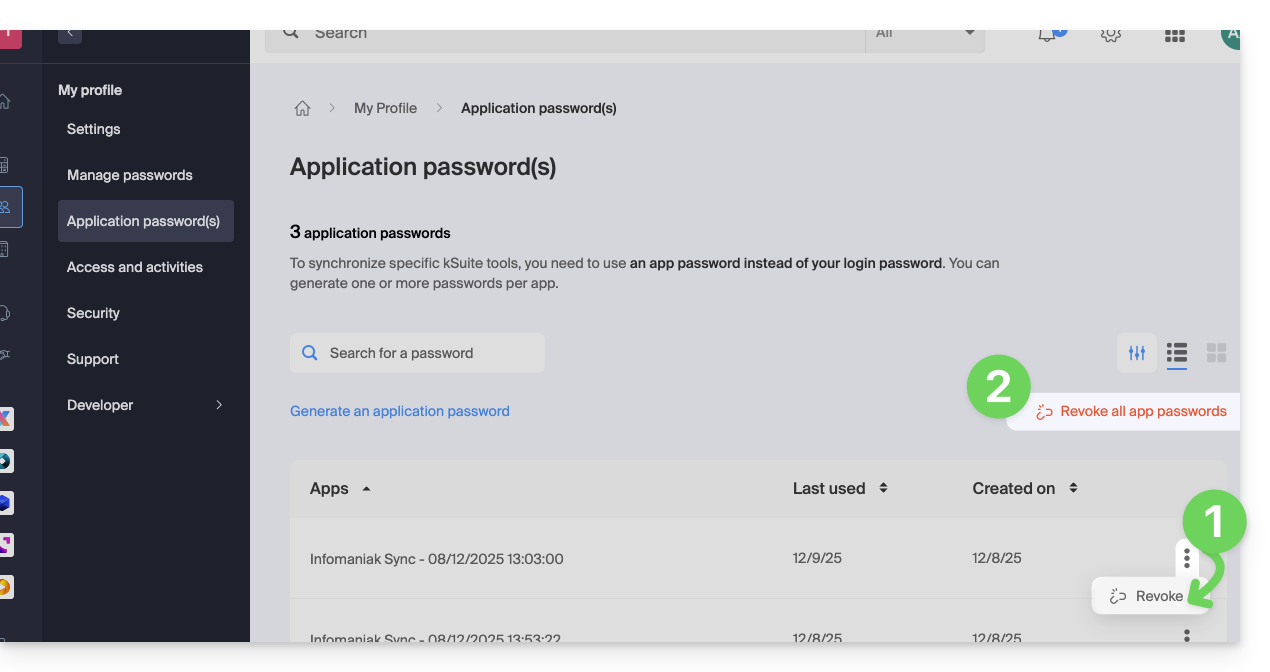
Revoke application passwords
In the same place, you can delete one or more application passwords when they are no longer useful:
- Click on the action button ⋮ to the right of each password and then revoke them…
- or on Revoke all at the top of the table:
Link to this FAQ:
Has this FAQ been helpful?
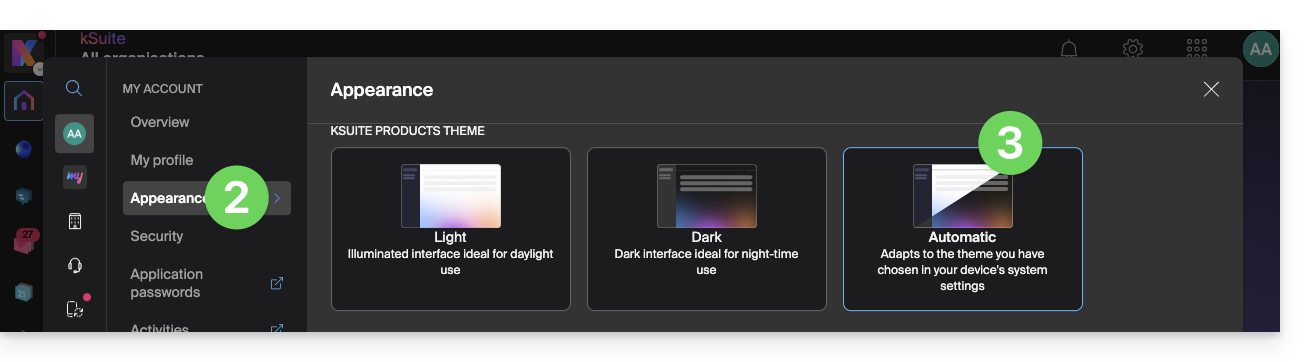
Infomaniak tools, such as the Web app Mail Infomaniak (online service ksuite.infomaniak.com/mail) or the interfaces Calendar, Contacts, kSuite… can be displayed in light mode or dark mode ("dark mode"), including based on the settings of your current operating system:
Enable manual mode
To manually choose a dark or light display, without relying on a possible different display on the operating system side:
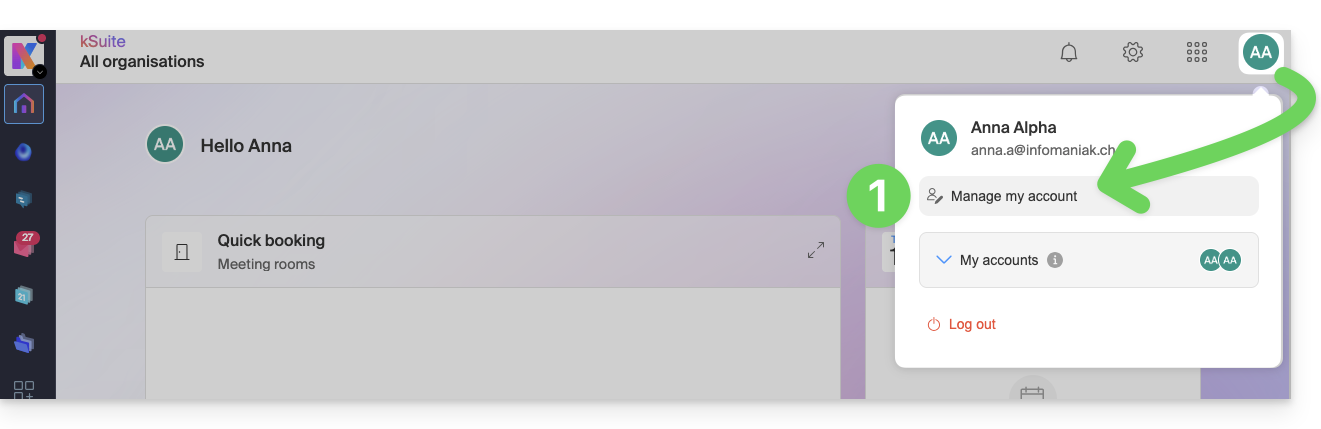
- Click here (or on the badge with your initials/avatar in the top right of the Infomaniak Manager) to "Manage my account":
- Then click on Appearance in the left sidebar.
- Click on Light to apply the light mode:
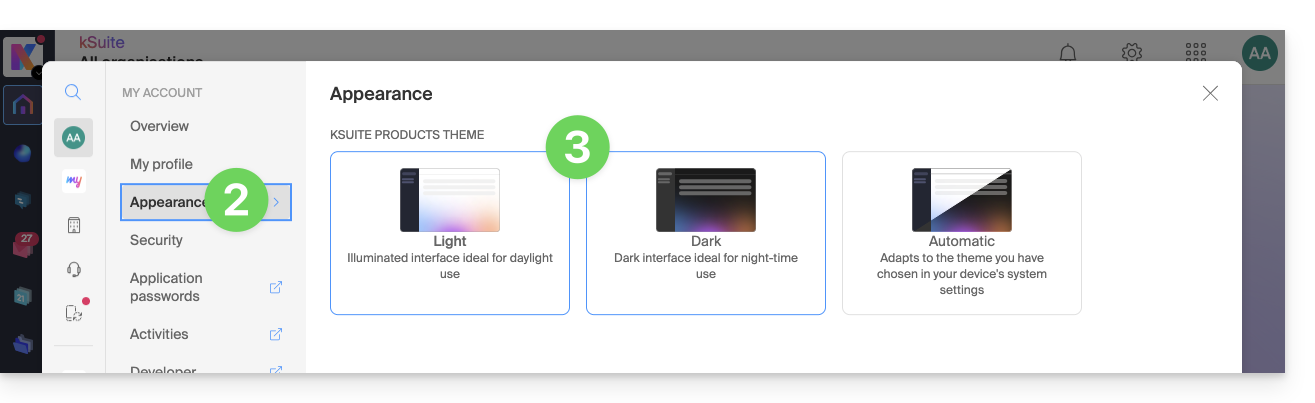
- Click on Dark to enable the "dark mode".
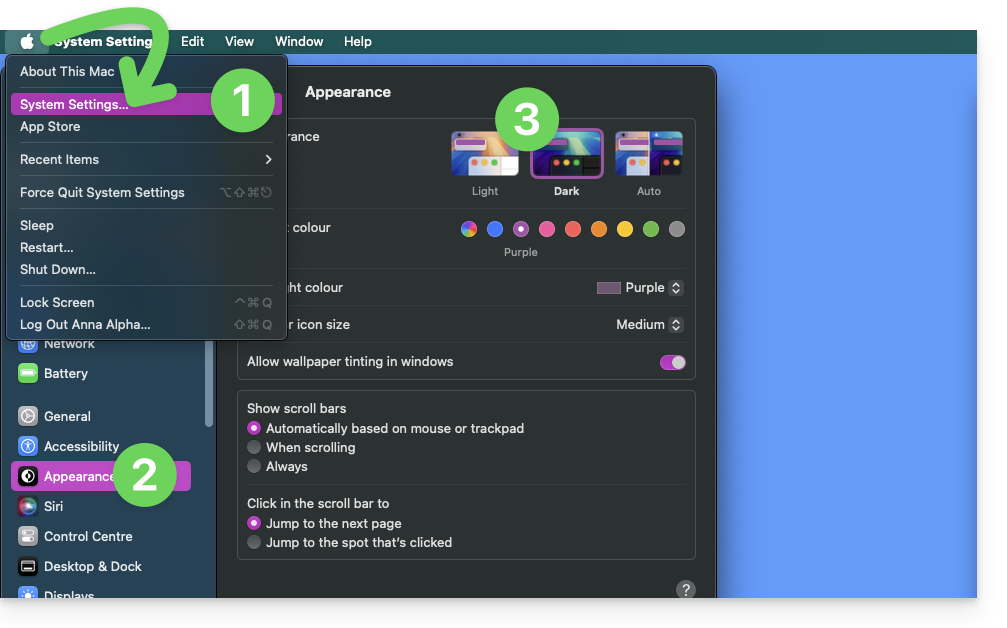
Enable automatic mode
The automatic mode is based on the parameters of your operating system (macOS / Windows...):
- Click here or on the badge with your initiales/avatar in the top right of the Infomaniak Manager) to "Manage my account":
- Click on Appearance in the left sidebar.
- Click on the Automatic mode:
Then if you wish to modify the light or dark theme of your computer, so that the Manager's automatic mode takes into account your preferences...
... on macOS
- Click on System Preferences...
- Click on Appearance.
- Choose the desired mode on the right:
... on Windows
- In the Start menu, open Settings > Personalization.
- Select Colors, then Choose your mode:
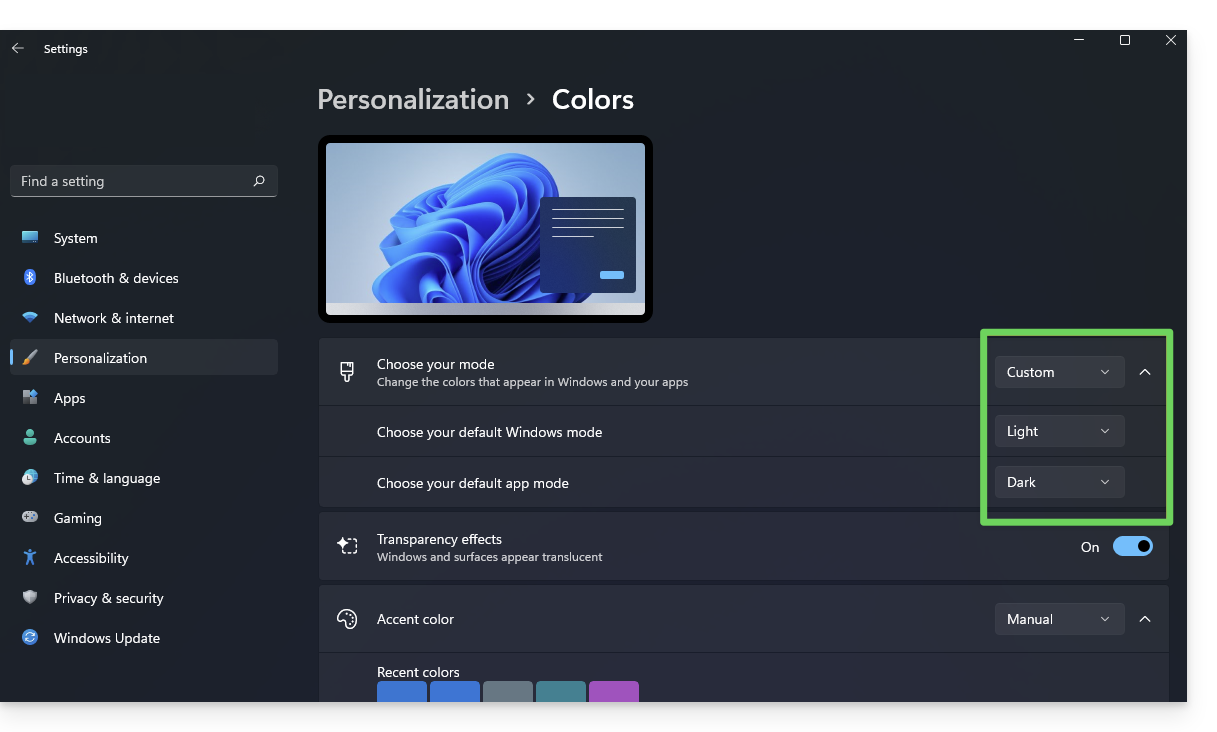
- You can choose between Light, Dark or Custom.
- If you select Custom, you will have the option to choose a default Windows mode and a different default application mode.
And on mobile?
The dark theme is enabled on mobile devices for Infomaniak login and account creation pages; it automatically adapts to the mobile system preferences, thus providing a consistent visual experience between mobile apps and login / account creation.
Link to this FAQ:
Has this FAQ been helpful?
This guide details the steps to take when you wish to “release” the management of an email address that is currently “limited” by the use of an Infomaniak account with the same name.
Preamble
- For example, the email address
benevolon the Mail Serviceexample.xyzwill no longer be shareable with other users from the moment an Infomaniak account is created with a login identifier in the form of the email addressbenevol@example.xyz. - Therefore, a procedure exists for the administrator of a Mail Service to activate the release of the corresponding Infomaniak account if necessary.
- The corresponding email address, previously attached and readable, will no longer be, but the account data is not deleted.
- Only the login address must be proposed in a different form by the user in question.
Request the release of the blocking Infomaniak account
To activate the deletion of the login identifier when it is identical to an email address that can no longer be shared, the administrator of the Mail Service must go to the Manager:
- Click here to access the management of your product on the Infomaniak Manager (need help?).
- Click directly on the name assigned to the product in question.
- Click on the email address concerned in the table that appears.
- Under the General tab, it is possible to see the users who consult this address, and among them, the corresponding user is found.
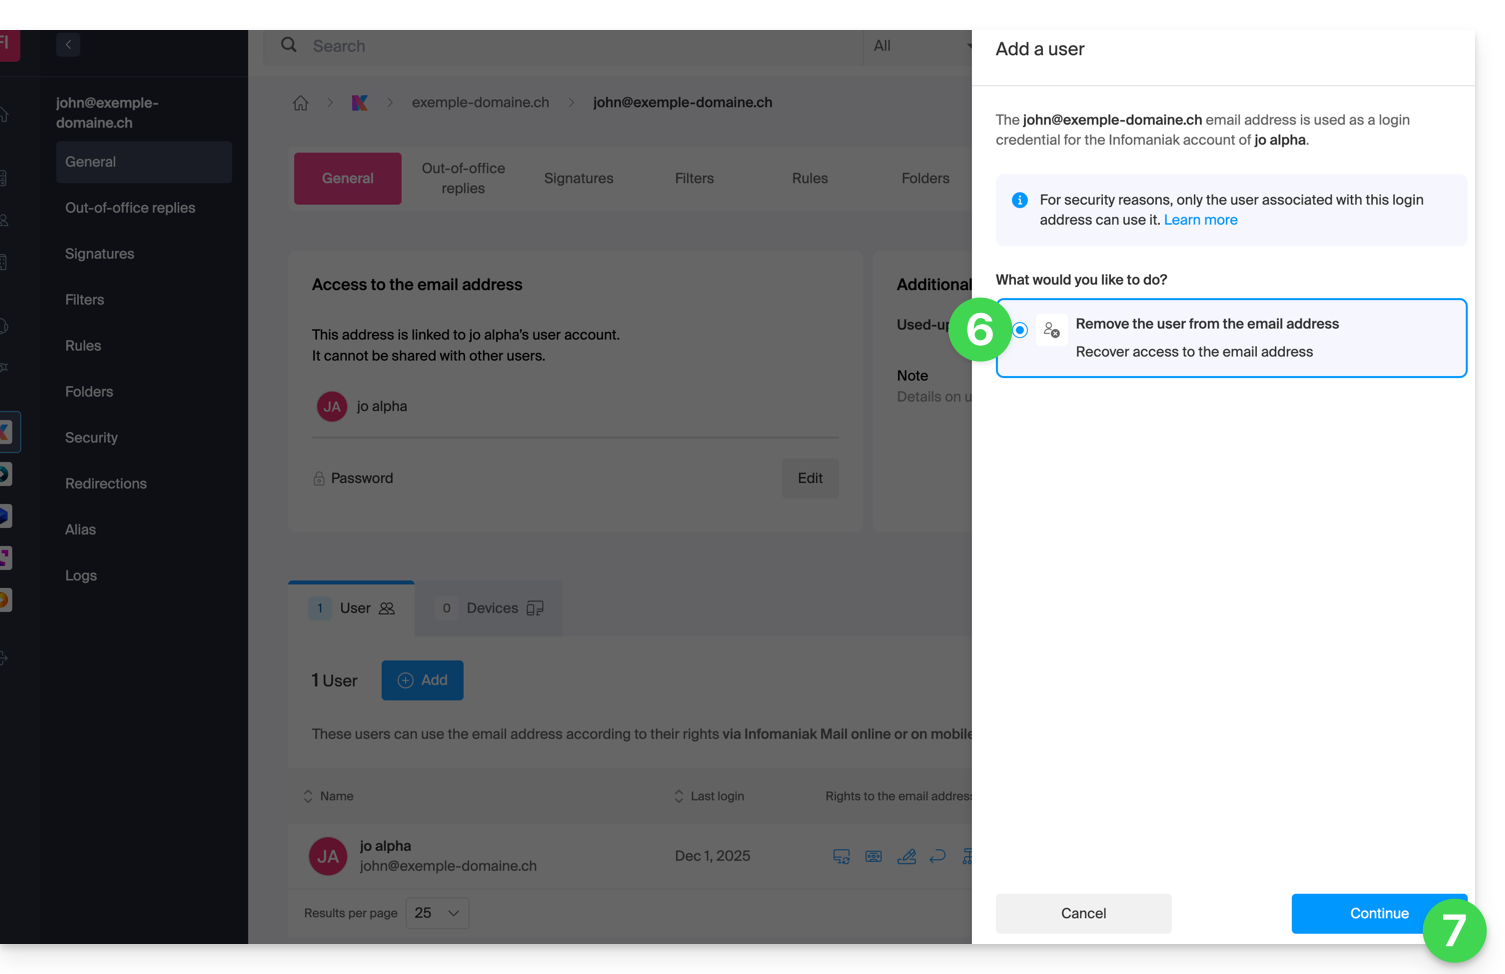
- Click the Add button in the Users section (an operation that is currently not possible):
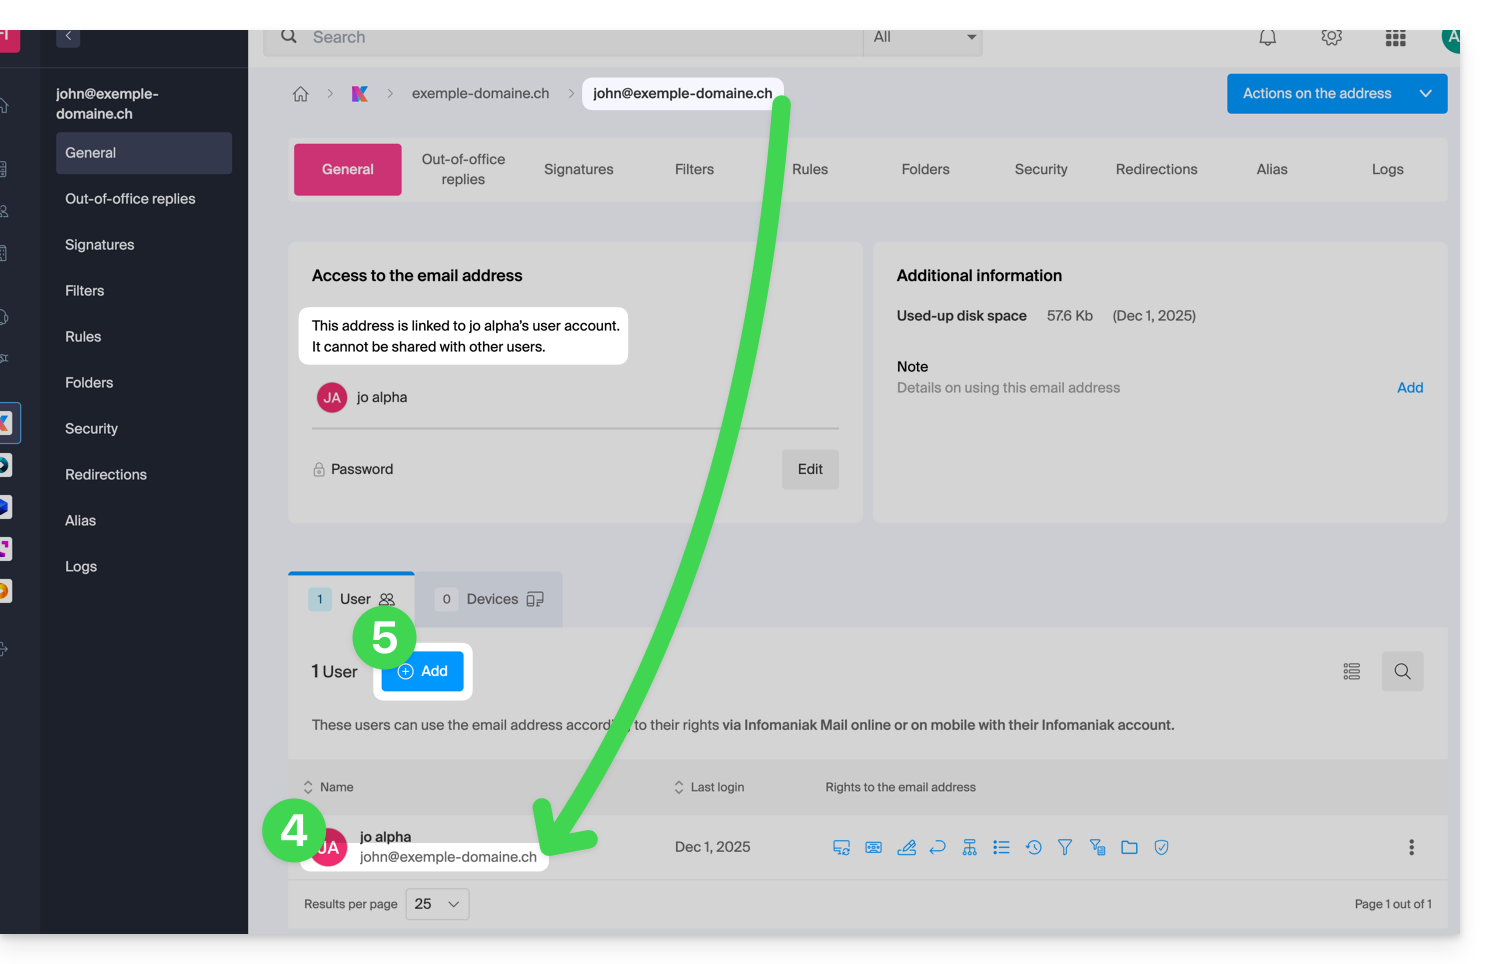
- In the right-hand sidebar, the assistant for releasing the address opens; click the radio button to activate the operation.
- Click Continue:
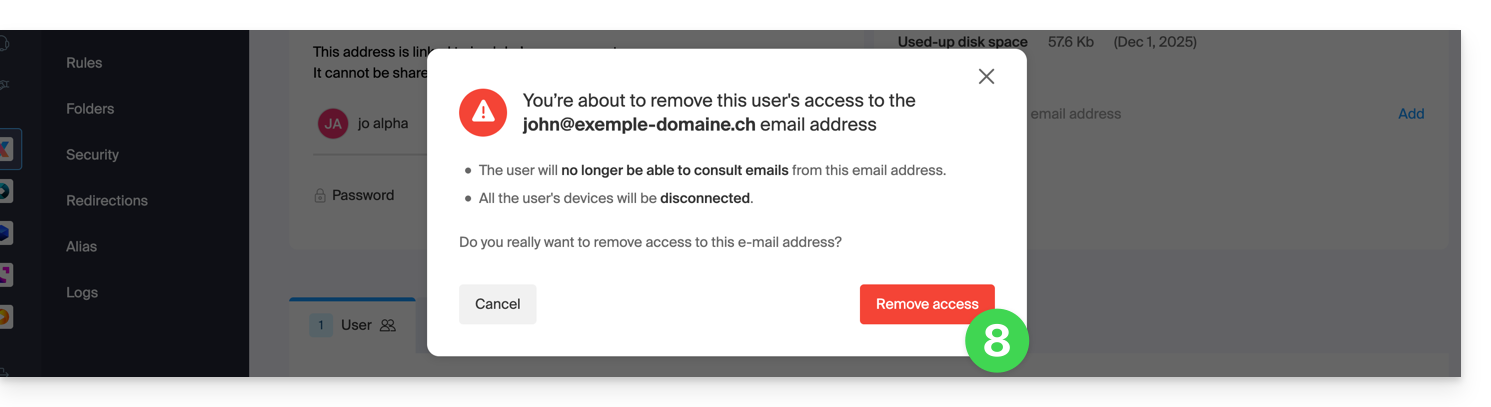
- Confirm the user disconnection operation:
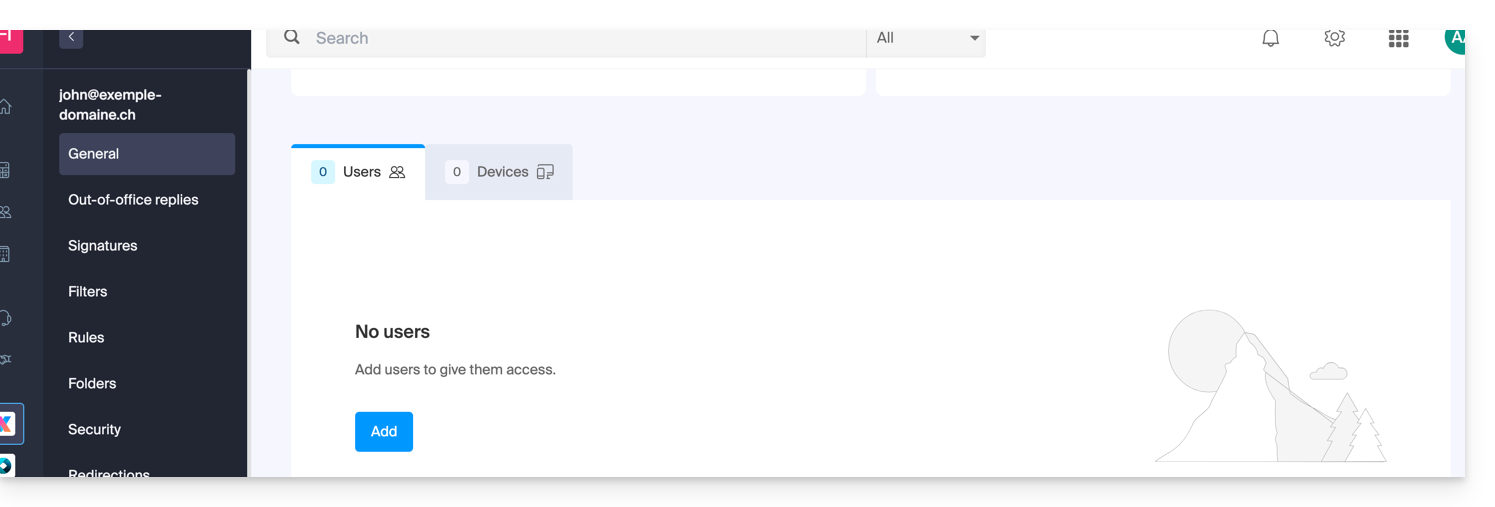
- The linked user disappears from the users page:
- In parallel, they receive an SMS similar to the example below, on the phone number they provided during their registration:
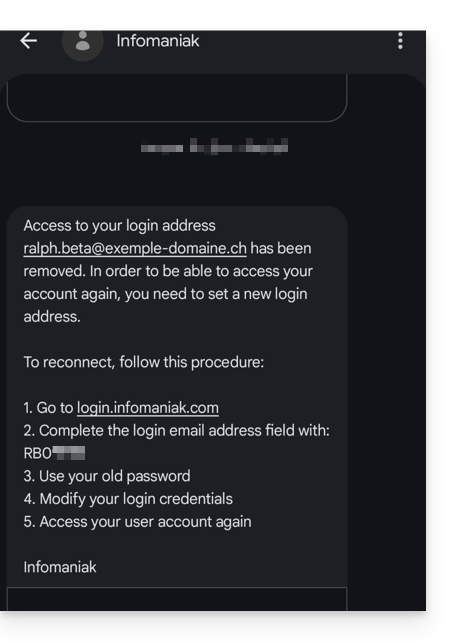
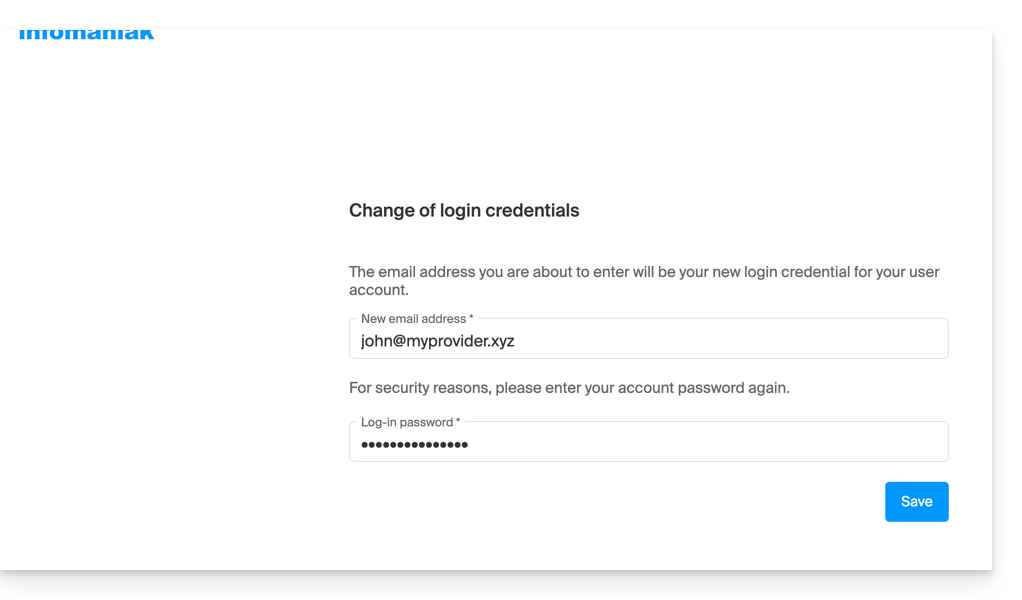
- This SMS indicates the procedure to follow to reconnect to their Infomaniak account with another email address of their choice (see below).
Recover access to the Infomaniak account
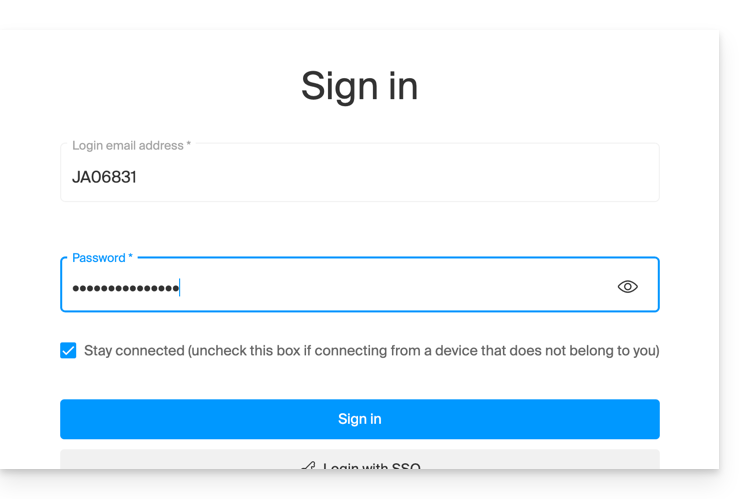
To be able to log back into your Infomaniak account now that access is no longer possible with the old email address, the Infomaniak account user must go to the address mentioned in the SMS:
- Click here to access the login page.
- Enter the username specified in the SMS (usually the initials of your account and a sequence of numbers).
- Enter the usual password (it has not changed):
- Enter the new requested information:
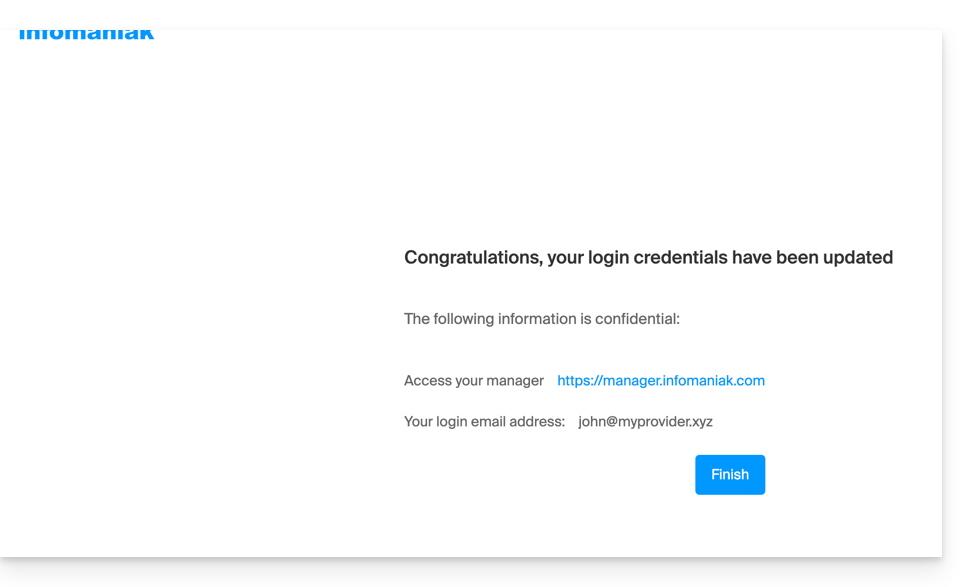
- You will be logged back into your account:
Link to this FAQ:
Has this FAQ been helpful?